K8S 13: Using Gitlab CI on GKE Cluster - Push Docker Image to GCR for Continuous Integration (CI)
Các bài trước thì mình đã nói đến CD (Continuous Deployment) rồi, giờ chuyển sang CI (Continuous Integration)
Table of Contents
Giới thiệu
Các bài trước thì mình đã nói đến CD (Continuous Deployment) rồi, giờ chuyển sang CI (Continuous Integration)
Nhắc đến tool về CI thì có nhiều, ví dụ như Jenkins, Travis CI, Circle CI, Gitlab CI,… etc.
Hôm nay mình sẽ giới thiệu về Gitlab CI
Mục đích của tutorial này là:
Setup 1 project sample để có thể sử dụng Gitlab CI, push Docker image lên Google Container Registry (GCR).
Trong đó thì Gitlab server có thể là:
- một là Gitlab tự dựng (Gitlab self-hosted) trên GKE (kubernetes)
- hoặc là bạn dùng luôn gitlab.com cho đỡ tốn công tạo Gitlab self-hosted
Yêu cầu
- Nếu muốn sử dụng Gitlab tự dựng (Gitlab self-hosted), bạn có thể làm theo bài sau (Nếu bạn đã có Gitlab server riêng (Gitlab self-hosted) thì có thể bỏ qua):
K8S 10
Sau khi làm theo link trên thì chúng ta có 1 Gitlab server riêng ở domain như sau:
https://gitlab.your-subdomain.your-domain.net/
-
Nếu muốn sử dụng gitlab.com thì ko cần làm theo link trên, chỉ cần bạn đã tạo account trên gitlab.com là được
-
Đã quen với việc sử dụng GCP Service, CloudShell, GKE…
Cách làm
Để có thể sử dụng Gitlab CI thì bạn cần setup Gitlab Runner (Đây là thứ dùng để chạy test/build/deploy source code cho bạn)
Và bạn nên setup nó riêng biệt với Gitlab Server nhé. (kiểu như Gitlab Runner sẽ chạy trong 1 namespace riêng, hay cluster riêng chẳng hạn), bài này mình dựng Gitlab Runner trong 1 namespace riêng là gitlab-runner.
1. Chuẩn bị biến môi trường trong CloudShell
# Nếu dùng Gitlab tự dựng (Gitlab self-hosted) thì sử dụng command:
export GITLAB_URL="https://gitlab.your-subdomain.your-domain.net/"
# Nếu dùng gitlab.com thì sử dụng command:
export GITLAB_URL="https://gitlab.com/"
gcloud config set project ${PROJECT_ID}
gcloud config set compute/region asia-northeast1
gcloud config set compute/zone asia-northeast1-a
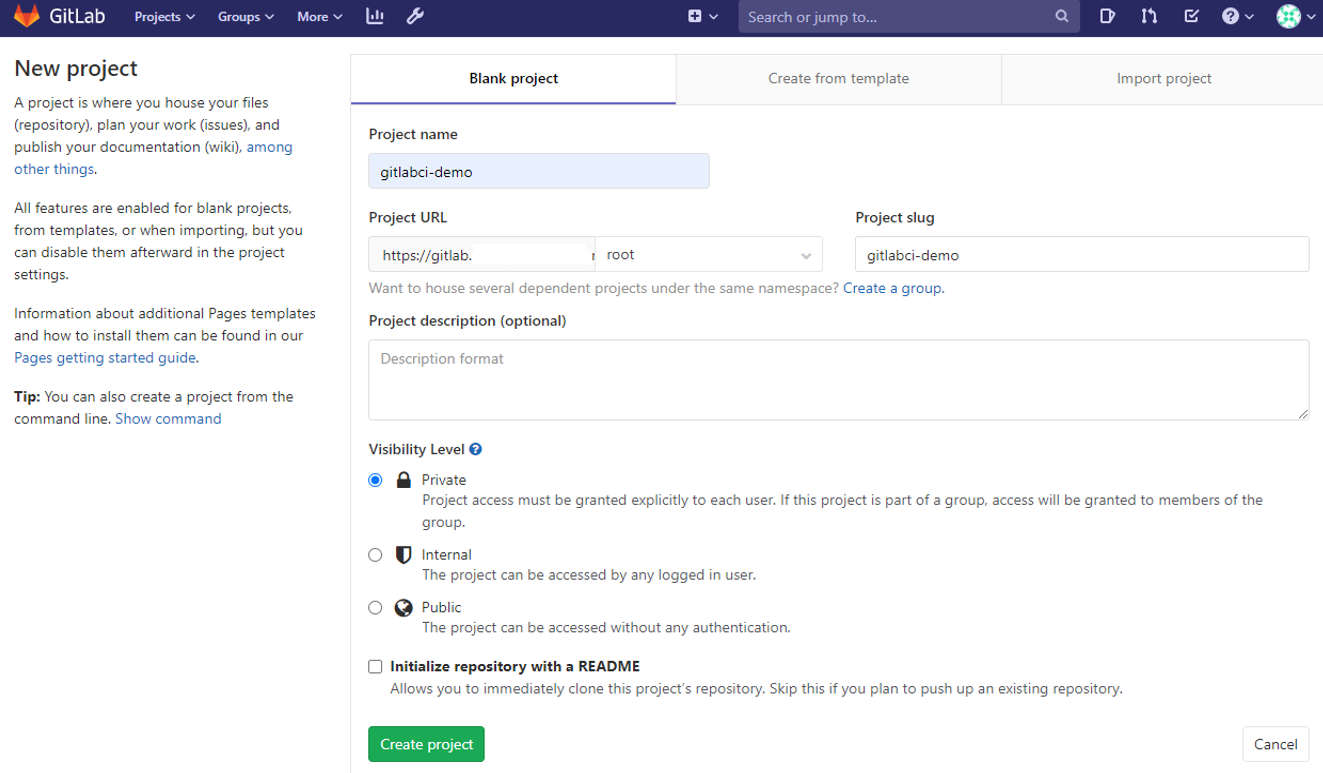
2. Tạo project trên Gitlab để test
Ở đây mình sẽ tạo 1 project rỗng tên là gitlabci-demo:
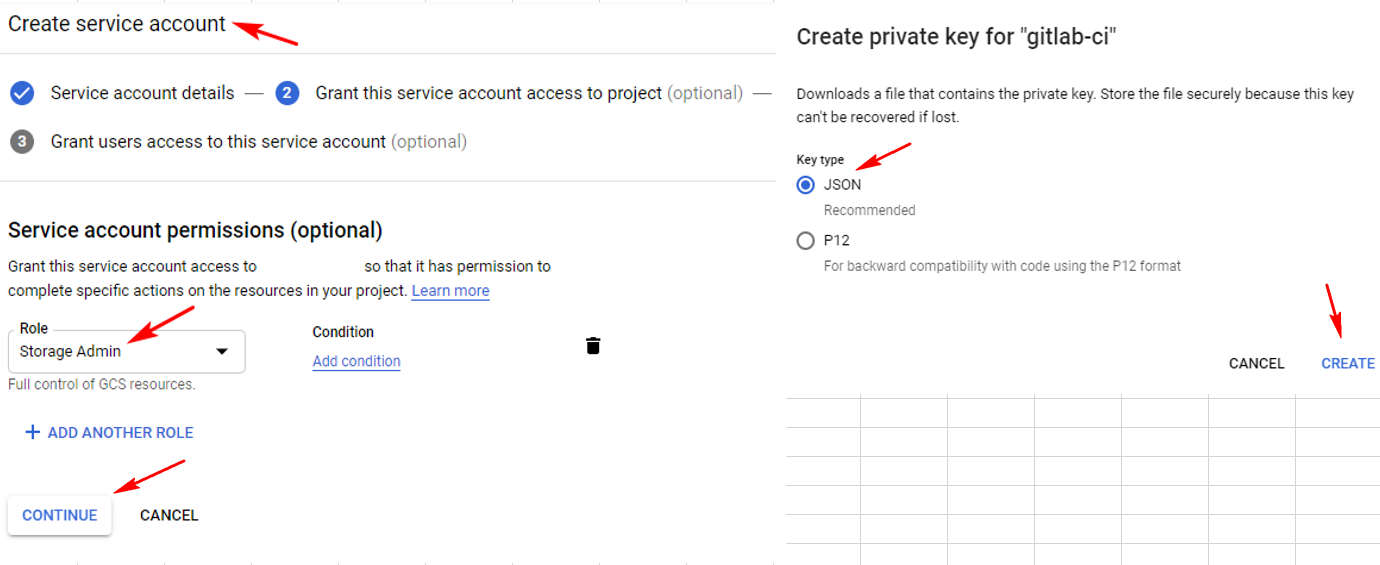
3. Tạo service account
Tiếp theo vào Google Cloud Console, tạo service account gitlab-ci, lấy file json key, save lại đâu đó bí mật nhé:
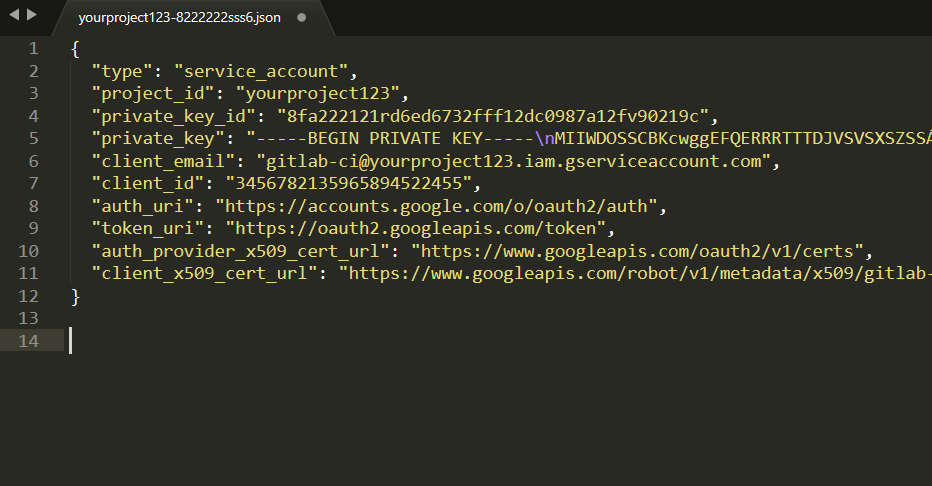
file json key của bạn nhận được có dạng như này:
4. Add variable vào Gitlab project
Quay lại Gitlab project gitlabci-demo, add thêm variable GCLOUD_SERVICE_KEY, value sẽ là nội dung của file json key đã lấy dc ở step trên, như hình sau:
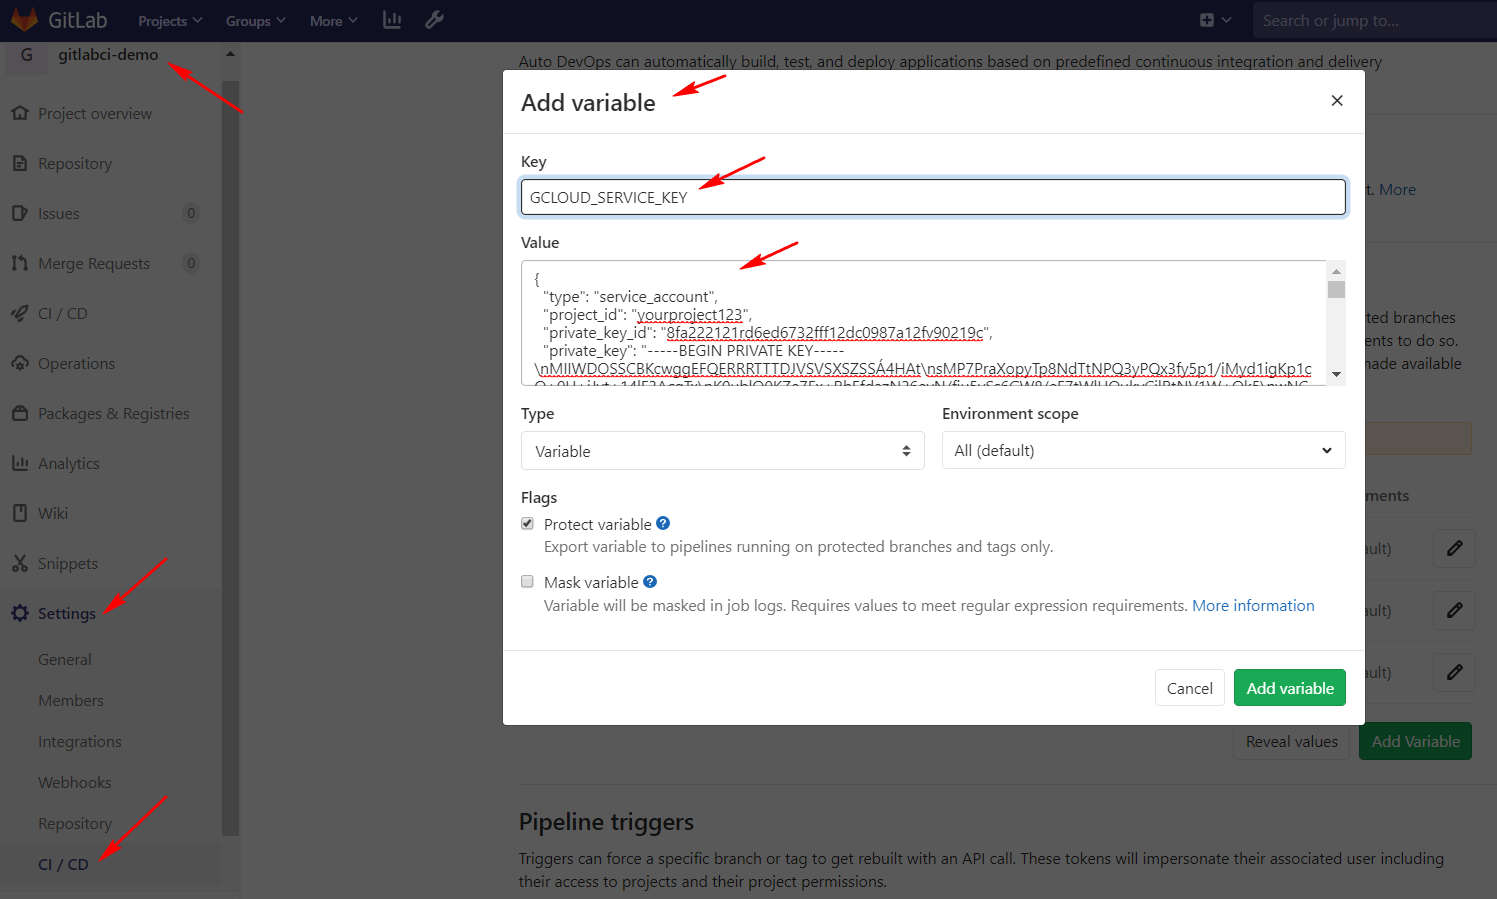
Tương tự như vậy, chúng ta tiếp tục tạo thêm 2 variable nữa là :
GCLOUD_PROJECT_ID (là Google Cloud Project ID của bạn) và
IMAGE_NAME (là tên của images mà bạn sẽ muốn tạo, cái này ví dụ mình sẽ để value là helloapp).
Chúng ta có kết quả sau khi add 3 variable như sau:

5. Get runner registration token
Tiếp theo lấy runner registration token để sau này install Gitlab Runner, vào phần này để lấy:
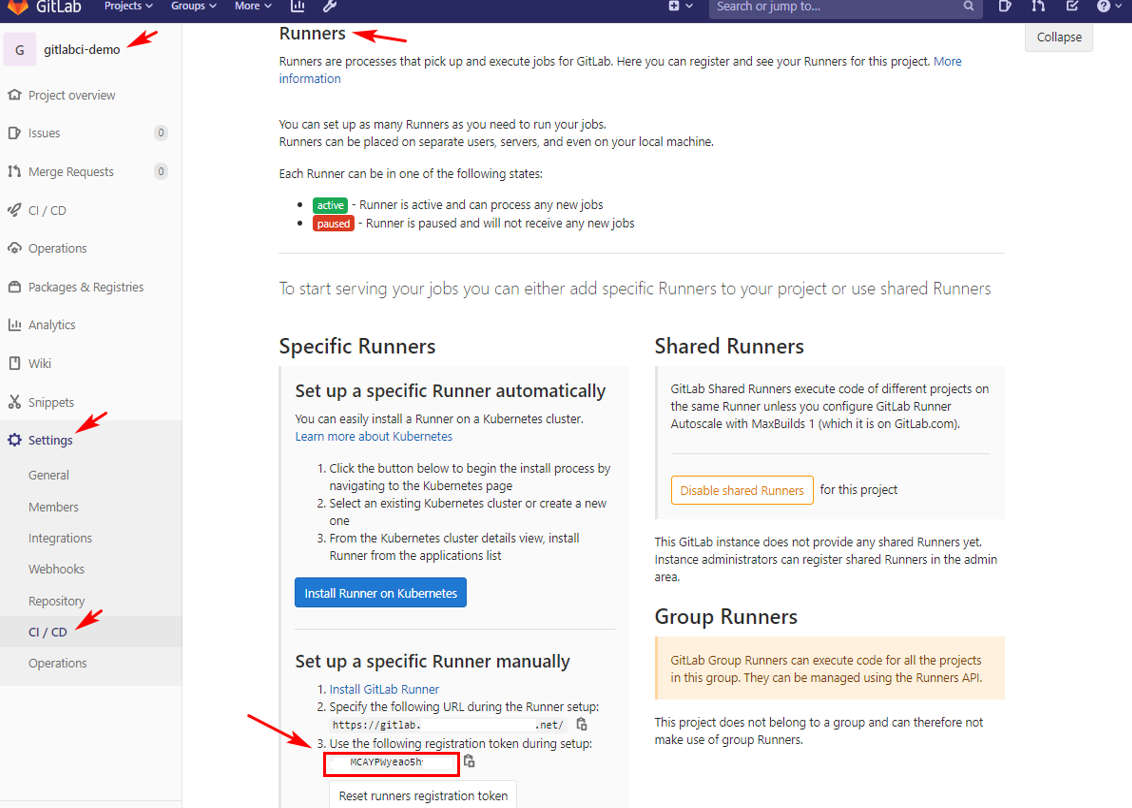
trong CloudShell hãy export token đó vào biến RUNNER_REG_TOKEN như sau:
export RUNNER_REG_TOKEN="_MBMCAYPWyeao5hf_2iH"
6. Install Gitlab Runner Helm Chart
Trong Cloudshell, Tạo file gitlab-runner-values.yaml:
cat > ./gitlab-runner-values.yaml <<EOF
## The GitLab Server URL (with protocol) that want to register the runner against
## ref: https://docs.gitlab.com/runner/commands/README.html#gitlab-runner-register
##
gitlabUrl: ${GITLAB_URL}

## The registration token for adding new Runners to the GitLab server. This must
## be retrieved from your GitLab instance.
## ref: https://docs.gitlab.com/ee/ci/runners/
##
runnerRegistrationToken: "${RUNNER_REG_TOKEN}"

## Set the certsSecretName in order to pass custom certificates for GitLab Runner to use
## Provide resource name for a Kubernetes Secret Object in the same namespace,
## this is used to populate the /etc/gitlab-runner/certs directory
## ref: https://docs.gitlab.com/runner/configuration/tls-self-signed.html#supported-options-for-self-signed-certificates
##
#certsSecretName:

## Configure the maximum number of concurrent jobs
## ref: https://docs.gitlab.com/runner/configuration/advanced-configuration.html#the-global-section
##
concurrent: 10

## Defines in seconds how often to check GitLab for a new builds
## ref: https://docs.gitlab.com/runner/configuration/advanced-configuration.html#the-global-section
##
checkInterval: 30

## For RBAC support:
rbac:
  create: true
  ## Define specific rbac permissions.
  resources: ["pods", "pods/exec", "secrets"]
  verbs: ["get", "list", "watch", "create", "patch", "delete"]

  ## Run the gitlab-bastion container with the ability to deploy/manage containers of jobs
  ## cluster-wide or only within namespace
  clusterWideAccess: false

  ## If RBAC is disabled in this Helm chart, use the following Kubernetes Service Account name.
  ##
  # serviceAccountName: default

## Configuration for the Pods that the runner launches for each new job
##
runners:
  ## Default container image to use for builds when none is specified
  ##
  image: ubuntu:18.04

  ## Run all containers with the privileged flag enabled
  ## This will allow the docker:stable-dind image to run if you need to run Docker
  ## commands. Please read the docs before turning this on:
  ## ref: https://docs.gitlab.com/runner/executors/kubernetes.html#using-docker-dind
  ##
  privileged: true

  ## Namespace to run Kubernetes jobs in (defaults to 'default')
  ##
  namespace: gitlab-runner

  ## Build Container specific configuration
  ##
  builds:
    # cpuLimit: 200m
    # memoryLimit: 256Mi
    cpuRequests: 100m
    memoryRequests: 128Mi

  ## Service Container specific configuration
  ##
  services:
    # cpuLimit: 200m
    # memoryLimit: 256Mi
    cpuRequests: 100m
    memoryRequests: 128Mi

  ## Helper Container specific configuration
  ##
  helpers:
    # cpuLimit: 200m
    # memoryLimit: 256Mi
    cpuRequests: 100m
    memoryRequests: 128Mi
EOF
Sau đó thì install Gitlab Runner Helm chart bằng file gitlab-runner-values.yaml vừa tạo:
helm repo add gitlab https://charts.gitlab.io
helm init
helm install --namespace gitlab-runner --name gitlab-runner gitlab/gitlab-runner -f gitlab-runner-values.yaml
Giả sử tương lai bạn có thay đổi gì file values và muốn update lại cái helm chart Gitlab Runner thì dùng command sau:
helm upgrade --namespace gitlab-runner --name gitlab-runner gitlab/gitlab-runner -f gitlab-runner-values.yaml
Nếu chạy thành công, 1 pod sẽ được tạo trong namespace gitlab-runner như này:
k get pods,svc,ing -n gitlab-runner
NAME                                               READY   STATUS    RESTARTS   AGE
pod/gitlab-runner-gitlab-runner-5876c44c67-q5bs5   1/1     Running   0          66s
7. tạo sample app helloapp và config .gitlab-ci.yml
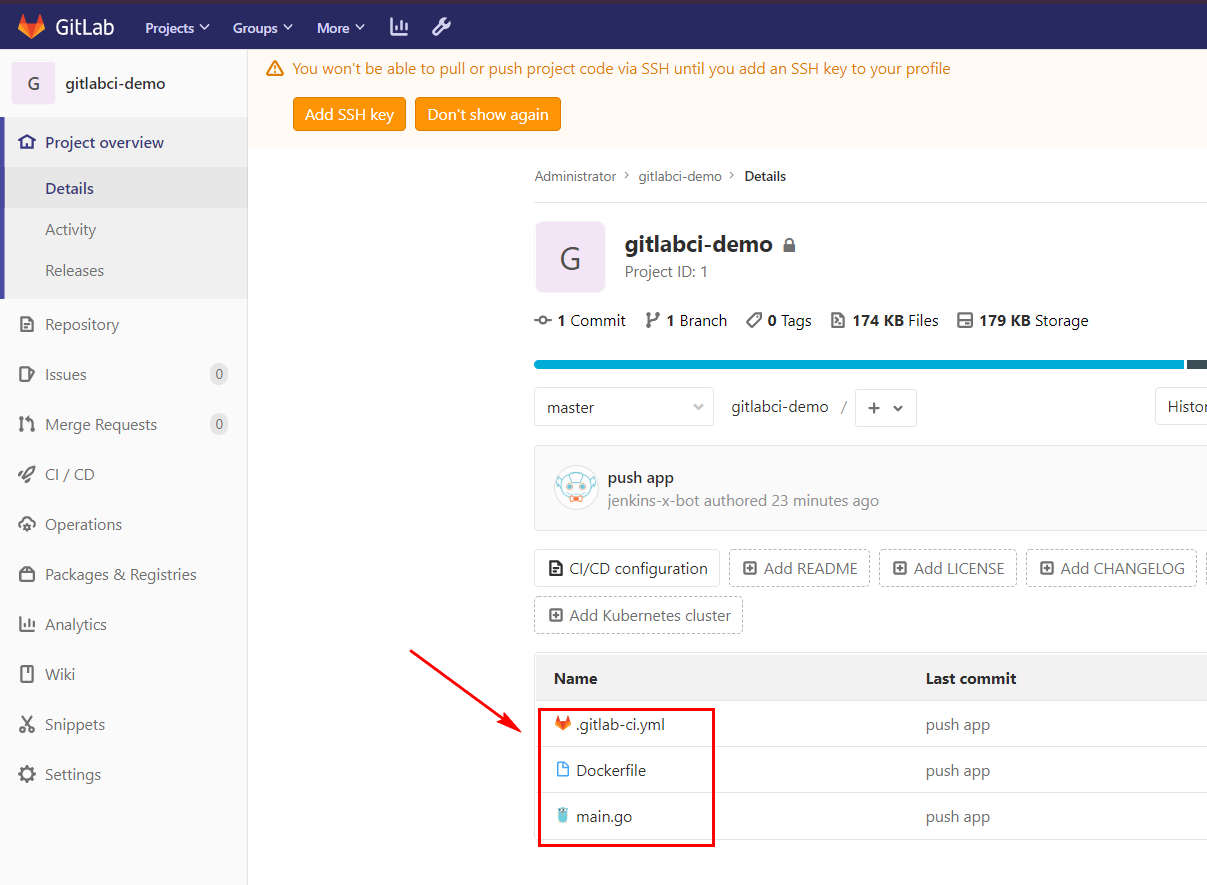
Đầu tiên clone project rỗng gitlabci-demo mà chúng ta đã tạo ban đầu về CloudShell:
git clone https://gitlab.your-subdomain.your-domain.net/root/gitlabci-demo.git
cd gitlabci-demo
tạo file main.go là 1 app đơn giản, nội dung như sau:
package main

import (
 "fmt"
 "log"
 "net/http"
)

var version = 1

func handler(w http.ResponseWriter, r *http.Request) {
 fmt.Fprintln(w, "Hello 世界... from v %s", version)
}
func main() {
 http.HandleFunc("/", handler)
 log.Fatal(http.ListenAndServe(":8888", nil))
}
tạo Dockerfile nội dung như sau:
FROM golang:1.11-alpine AS build
WORKDIR /
COPY main.go go.* /
RUN CGO_ENABLED=0 go build -o /bin/demo
FROM scratch
COPY --from=build /bin/demo /bin/demo
ENTRYPOINT ["/bin/demo"]
tạo file .gitlab-ci.yml nội dung như sau:
image: docker:latest

services:
  - docker:18.09.7-dind

variables:
  DOCKER_HOST: tcp://127.0.0.1:2375 # When using Gitlab self-hosted on K8s
  # DOCKER_HOST: tcp://docker:2375/ # When using Gitlab.com
  DOCKER_DRIVER: overlay
  DOCKER_API_VERSION: "1.39"

stages:
  - publish
publish:
  stage: publish
  before_script:
    # Login to Google Cloud Registry
    - echo $GCLOUD_SERVICE_KEY | docker login -u _json_key --password-stdin https://gcr.io
  script:
    - docker build -t $IMAGE_NAME .
    - docker tag $IMAGE_NAME "gcr.io/$GCLOUD_PROJECT_ID/$IMAGE_NAME"
    - docker push "gcr.io/$GCLOUD_PROJECT_ID/$IMAGE_NAME:latest"
  only:
    - master
giải thích: ở đây mình chỉ tạo 1 step publish, step bao gồm build Docker image, tagging và push image đó lên GCR
8. Push local project lên Gitlab Server
Giờ push tất cả những file đã tạo thêm lên Gitlab Server:
git add .
git commit -m "push app"
git push origin master
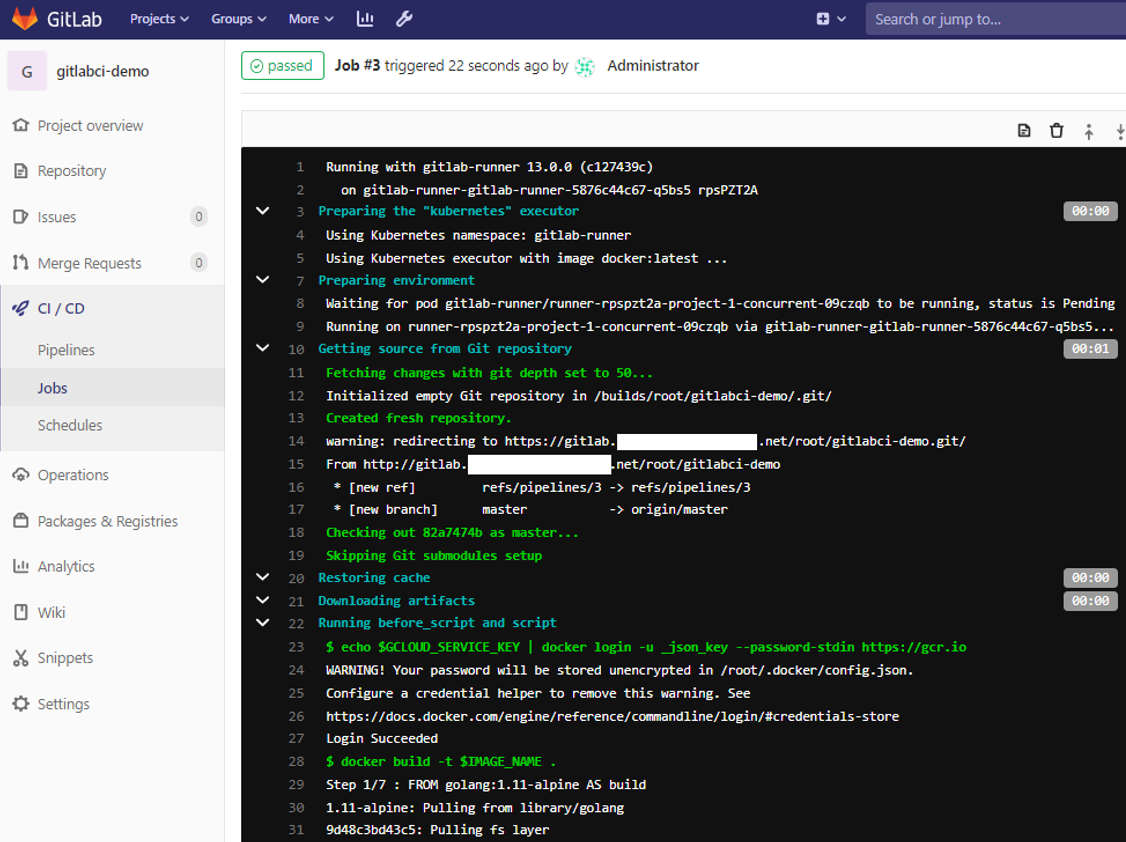
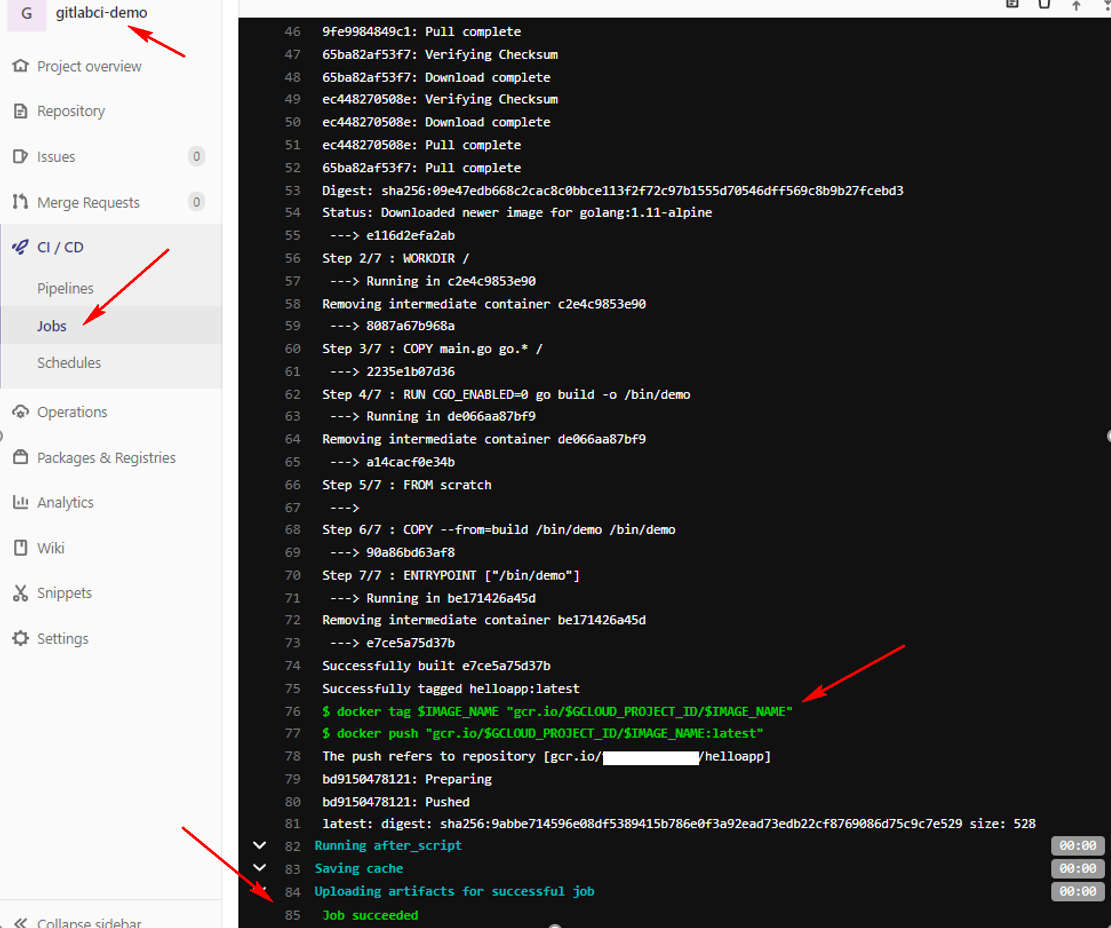
9. Kết quả
kết quả như sau, Gitlab sẽ detect được project của bạn có .gitlab-ci.yml nên nó sẽ trigger Gitlab Runner thực hiện các step trong file .gitlab-ci.yml đó.
Bạn có thể check kết quả khi vào các màn hình sau:
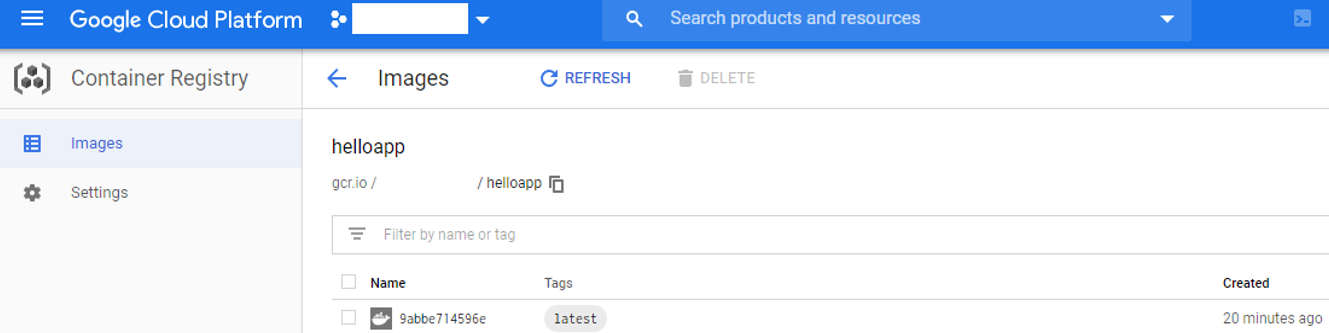
Vào Google Container Registry Service sẽ thấy image helloapp đã được push lên như sau:
DONE! 🎉🎉
Kết hợp với các bài về CD trước thì bạn đã có 1 flow CI/CD hoàn chỉnh rồi 😍
10. (Bonus) Tùy biến thêm với file .gitlab-ci.yml
image: docker:latest

services:
  - docker:18.09.7-dind

variables:
  DOCKER_HOST: tcp://127.0.0.1:2375 # When using Gitlab self-hosted on K8s
  # DOCKER_HOST: tcp://docker:2375/ # When using Gitlab.com
  DOCKER_DRIVER: overlay
  DOCKER_API_VERSION: "1.39"
  TEST_IMAGE: gcr.io/$GCLOUD_PROJECT_ID/$IMAGE_NAME:$CI_COMMIT_REF_NAME-$CI_COMMIT_SHORT_SHA
  RELEASE_IMAGE: gcr.io/$GCLOUD_PROJECT_ID/$IMAGE_NAME:latest-$CI_COMMIT_SHORT_SHA

stages:
- build
# - test
- release

before_script:
  # Login to Google Cloud Registry
  - echo $GCLOUD_SERVICE_KEY | docker login -u _json_key --password-stdin https://gcr.io

build:
  stage: build
  script:
    - docker build -t $TEST_IMAGE .
    - docker push $TEST_IMAGE

# test:
#   stage: test
#   script:
#     - docker pull $TEST_IMAGE
#     - docker run $TEST_IMAGE npm test

release:
  stage: release
  script:
    - docker pull $TEST_IMAGE
    - docker tag $TEST_IMAGE $RELEASE_IMAGE
    - docker push $RELEASE_IMAGE
  only:
    - master
CREDIT
https://docs.gitlab.com/runner/install/kubernetes.html
https://docs.gitlab.com/ee/ci/runners/
http://www.idevops.site/gitlabci/chapter04/01/5/
https://gitlab.com/gitlab-org/gitlab-runner/-/issues/25803
https://gitlab.com/gitlab-org/gitlab-runner/-/issues/2623
https://gitlab.com/gitlab-org/charts/gitlab/-/issues/478
https://gitlab.com/gitlab-org/gitlab-runner/-/blob/master/docs/executors/kubernetes.md#using-dockerdind
https://gitlab.com/gitlab-org/gitlab-foss/-/issues/34419
https://stackoverflow.com/questions/36408339/best-cd-strategy-for-kubernetes-deployments/48268573#48268573
https://stackoverflow.com/questions/47888027/how-to-deploy-staging-in-google-cloud-platform-with-kubernetes-and-gitlab-ci-cd
https://www.digitalocean.com/community/tutorials/how-to-build-docker-images-and-host-a-docker-image-repository-with-gitlab
https://github.com/JanMikes/gitlab-ci-push-to-gcr/blob/master/.gitlab-ci.yml
https://rhazn.com/posts/build-a-docker-image-on-gitlab-ci-and-publish-it-to-google-container-registry/
https://gist.github.com/foklepoint/2f9087375830068ec032ef326d93f423
https://medium.com/@gaforres/publishing-google-cloud-container-registry-images-from-gitlab-ci-23c45356ff0e
https://qiita.com/proudust/items/d94c60ec69dead927954
https://docs.gitlab.com/ee/ci/variables/