K8S 14: (on GKE Cluster) Setup Sonarqube for Maven Project With GitlabCI
Bài này hướng dẫn cách setup 1 server Sonarqube để **scan quality code** cho 1 Java (Spring) project.
Table of Contents
Giới thiệu
Tưởng tượng rằng bạn đã có:
- GKE Cluster,
- dựng Gitlab Runner,
- Gitlab self-hosted (hoặc dùng gitlab.com).
- 1 java project (dùng Maven) trên Gitlab.
- Bạn muốn sử dụng Gitlab CI để tạo pipeline.
Bài này hướng dẫn cách setup 1 server Sonarqube để scan quality code cho 1 Java (Spring) project.
Kết thúc bài này sẽ có 1 flow kiểu như sau, project Java của bạn mỗi khi có 1 commit trên Gitlab sẽ:
- trigger Gitlab Runner thực hiện scan quality code bằng Sonarqube,
- sau đó build artifacts (tạo file .jar, .war),
- rồi build Docker images,
- và publish Docker images đó lên Registry của bạn (có thể là Dockerhub hoặc GCR, etc…)
Yêu cầu
Đã hoàn thành bài K8S 9 này để setup domain với nginx, external-dns, cert-manager:
K8S 9
Cách làm
Workspace chúng ta vẫn sẽ là GCP CloudShell
1. Chuẩn bị biến môi trường, namespace và secrets
export PROJECT_ID="your-project-id"
export DOMAIN="your-domain.net"
export SUBDOMAIN="your-subdomain.your-domain.net"
export SONAR_SUBDOMAIN="sonarqube.your-subdomain.your-domain.net"
export SPRINGAPP_SUBDOMAIN="springapp.your-subdomain.your-domain.net"
export CLUSTER_NAME="your-cluster-name"
gcloud config set project ${PROJECT_ID}
gcloud config set compute/region asia-northeast1
gcloud config set compute/zone asia-northeast1-a
# Ở đây chúng ta sử dụng lại TLS secret mà đã dc issue thành công ở bài `K8S 9`
export TLS_SECRET_NAME="echo-tls-secret-prod"
2. Install kubed để sync secret sang các namespace cần thiết
(Nếu bạn đã làm bước này thì có thể bỏ qua):
helm repo add appscode https://charts.appscode.com/stable/
helm repo update
helm install -n kubed appscode/kubed --version 0.12.0 --namespace kube-system --wait --set config.clusterName=${CLUSTER_NAME}
2. Setup Sonarqube Helm chart
Tạo namespace dành cho sonarqube:
kubectl create namespace sonarqube
Đánh label app=kubed cho namespace sonarqube:
kubectl label namespace sonarqube app=kubed
Annotate để secret mình muốn sẽ sync sang các namespace có label app=kubed:
kubectl annotate secret ${TLS_SECRET_NAME} -n default kubed.appscode.com/sync="app=kubed"
Annotate domain sẽ dùng cho sonarqube vào Ingress nginx đã tạo:
kubectl annotate service nginx-ingress-controller "external-dns.alpha.kubernetes.io/hostname=${SONAR_SUBDOMAIN}.,${SUBDOMAIN}." -n nginx-ingress --overwrite
Sau khi annotate thành công bạn vào CloudDNS sẽ thấy domain của sonarqube đã được tạo ra, nó sẽ có chung IP v4 address với your-subdomain.net như ảnh sau:
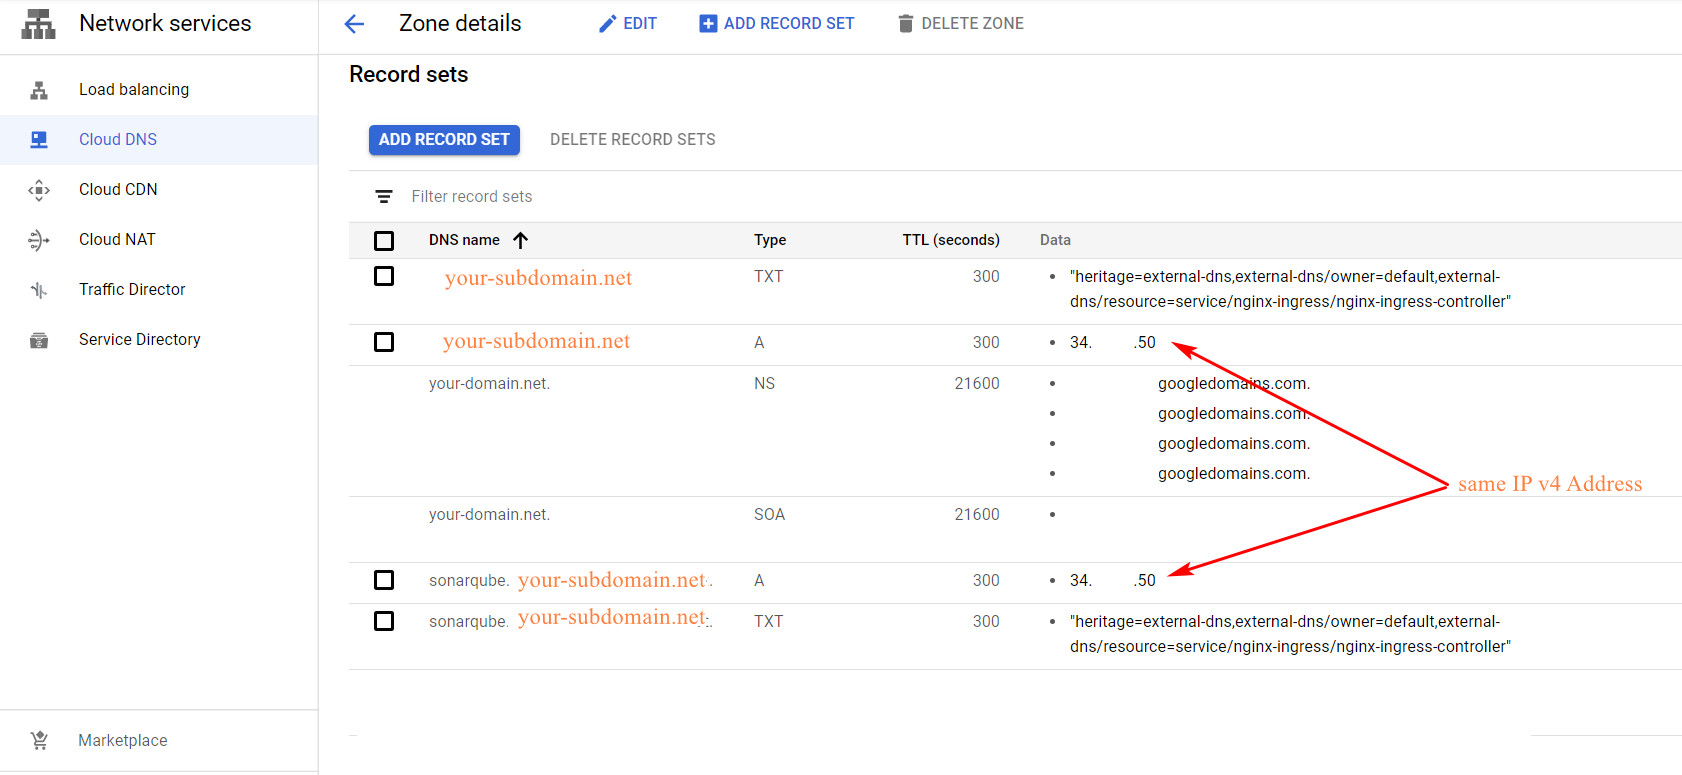
Còn khi vào cluster get thông tin các service ra bạn sẽ thấy IP v4 address đó chính là IP của Nginx-ingress-controller type LoadBalancer:
k get svc -A
NAMESPACE       NAME                            TYPE           CLUSTER-IP      EXTERNAL-IP   PORT(S)                      AGE
cert-manager    cert-manager                    ClusterIP      10.68.114.39    <none>        9402/TCP                     12h
cert-manager    cert-manager-webhook            ClusterIP      10.68.119.213   <none>        443/TCP                      12h
default         echo                            ClusterIP      10.68.181.83    <none>        80/TCP                       10h
default         kubernetes                      ClusterIP      10.68.0.1       <none>        443/TCP                      12h
kube-system     default-http-backend            NodePort       10.68.107.169   <none>        80:31554/TCP                 12h
kube-system     kube-dns                        ClusterIP      10.68.0.10      <none>        53/UDP,53/TCP                12h
kube-system     kubed                           ClusterIP      10.68.111.17    <none>        443/TCP                      12h
kube-system     metrics-server                  ClusterIP      10.68.47.251    <none>        443/TCP                      12h
kube-system     tiller-deploy                   ClusterIP      10.68.181.222   <none>        44134/TCP                    12h
nginx-ingress   external-dns                    ClusterIP      10.68.239.9     <none>        7979/TCP                     12h
nginx-ingress   nginx-ingress-controller        LoadBalancer   10.68.8.115     34.11.12.50   80:31291/TCP,443:31035/TCP   12h
nginx-ingress   nginx-ingress-default-backend   ClusterIP      10.68.72.132    <none>        80/TCP                       12h
sonarqube       sonar-postgresql                ClusterIP      10.68.24.201    <none>        5432/TCP                     48m
sonarqube       sonar-postgresql-headless       ClusterIP      None            <none>        5432/TCP                     48m
sonarqube       sonar-sonarqube                 ClusterIP      10.68.78.189    <none>        9000/TCP                     48m
Mình mô tả kỹ như vầy để bạn hiểu rằng nếu bạn thấy domain cho sonarqube của bạn mà ko dùng chung 1 IP với nginx và subdomain thì có nghĩa bạn đang setting sai nha
Tạo file sonarqube-values.yaml:
câu lệnh sau sẽ sử dụng 2 biến môi trường đã setup bên trên là ${TLS_SECRET_NAME} và ${SONAR_SUBDOMAIN}:
cat > ./sonarqube-values.yaml <<EOF
# Default values for sonarqube.
# This is a YAML-formatted file.
# Declare variables to be passed into your templates.
replicaCount: 1

 # This will use the default deployment strategy unless it is overriden
deploymentStrategy: {}
# Uncomment this to scheduler pods on priority
# priorityClassName: "high-priority"

image:
  repository: sonarqube
  tag: 8.2-community
  # If using a private repository, the name of the imagePullSecret to use
  # pullSecret: my-repo-secret

# Set security context for sonarqube pod
securityContext:
  fsGroup: 999

# Settings to configure elasticsearch host requirements
elasticsearch:
  configureNode: true
  bootstrapChecks: true

service:
  type: ClusterIP
  externalPort: 9000
  internalPort: 9000
  labels:
  annotations: {}
  # May be used in example for internal load balancing in GCP:
  # cloud.google.com/load-balancer-type: Internal
  # loadBalancerSourceRanges:
  #   - 0.0.0.0/0
  # loadBalancerIP: 1.2.3.4
ingress:
  enabled: true
  # Used to create an Ingress record.
  hosts:
    - name: ${SONAR_SUBDOMAIN}
      # Different clouds or configurations might need /* as the default path
      path: /
      # For additional control over serviceName and servicePort
      serviceName: sonar-sonarqube
      servicePort: 9000
  annotations:
    kubernetes.io/ingress.class: nginx
  # kubernetes.io/tls-acme: "true"
  # This property allows for reports up to a certain size to be uploaded to SonarQube
  # nginx.ingress.kubernetes.io/proxy-body-size: "8m"

# Additional labels for Ingress manifest file
  # labels:
  #  traffic-type: external
  #  traffic-type: internal
  tls:
  # Secrets must be manually created in the namespace.
  - secretName: ${TLS_SECRET_NAME}
    hosts:
      - ${SONAR_SUBDOMAIN}

# Affinity for pod assignment
# Ref: https://kubernetes.io/docs/concepts/configuration/assign-pod-node/#affinity-and-anti-affinity
affinity: {}

# Tolerations for pod assignment
# Ref: https://kubernetes.io/docs/concepts/configuration/taint-and-toleration/
tolerations: []

# Node labels for pod assignment
# Ref: https://kubernetes.io/docs/user-guide/node-selection/
nodeSelector: {}

# hostAliases allows the modification of the hosts file inside a container
hostAliases: []
# - ip: "192.168.1.10"
#   hostnames:
#   - "example.com"
#   - "www.example.com"

readinessProbe:
  initialDelaySeconds: 60
  periodSeconds: 30
  failureThreshold: 6
  # If an ingress *path* other than the root (/) is defined, it should be reflected here
  # A trailing "/" must be included
  sonarWebContext: /
  # sonarWebContext: /sonarqube/
livenessProbe:
  initialDelaySeconds: 60
  periodSeconds: 30
  # If an ingress *path* other than the root (/) is defined, it should be reflected here
  # A trailing "/" must be included
  sonarWebContext: /
  # sonarWebContext: /sonarqube/
  # If an ingress *path* is defined, it should be reflected here
  # sonar.web.context: /sonarqube

## Provide a secret containing one or more certificate files in the keys that will be added to cacerts
## The cacerts file will be set via SONARQUBE_WEB_JVM_OPTS
##
# caCerts:
#   secret: my-secret

## Values to add to SONARQUBE_WEB_JVM_OPTS
##
# jvmOpts: "-Djava.net.preferIPv4Stack=true"
jvmOpts: ""

## Environment variables to attach to the pods
##
# env:
#   - name: VARIABLE
#     value: my-value

# Set annotations for pods
annotations: {}

resources: {}
# We usually recommend not to specify default resources and to leave this as a conscious
# choice for the user. This also increases chances charts run on environments with little
# resources, such as Minikube. If you do want to specify resources, uncomment the following
# lines, adjust them as necessary, and remove the curly braces after 'resources:'.
# limits:
#  cpu: 100m
#  memory: 128Mi
# requests:
#  cpu: 100m
#  memory: 128Mi
persistence:
  enabled: false
  ## Set annotations on pvc
  annotations: {}

  ## Specify an existing volume claim instead of creating a new one.
  ## When using this option all following options like storageClass, accessMode and size are ignored.
  # existingClaim:

  ## If defined, storageClassName: <storageClass>
  ## If set to "-", storageClassName: "", which disables dynamic provisioning
  ## If undefined (the default) or set to null, no storageClassName spec is
  ##   set, choosing the default provisioner.  (gp2 on AWS, standard on
  ##   GKE, AWS & OpenStack)
  ##
  storageClass:
  accessMode: ReadWriteOnce
  size: 10Gi

  ## Specify extra volumes. Refer to ".spec.volumes" specification : https://kubernetes.io/fr/docs/concepts/storage/volumes/
  volumes: []
  ## Specify extra mounts. Refer to ".spec.containers.volumeMounts" specification : https://kubernetes.io/fr/docs/concepts/storage/volumes/
  mounts: []

# In case you want to specify different resources for emptyDir than {}
emptyDir: {}
  # Example of resouces that might be used:
  # medium: Memory
  # sizeLimit: 16Mi

# List of plugins to install.
# For example:
# plugins:
#  install:
#    - "https://github.com/AmadeusITGroup/sonar-stash/releases/download/1.3.0/sonar-stash-plugin-1.3.0.jar"
#    - "https://github.com/SonarSource/sonar-ldap/releases/download/2.2-RC3/sonar-ldap-plugin-2.2.0.601.jar"
plugins:
  install: []
  lib: []

  # For use behind a corporate proxy when downloading plugins
  # httpProxy: ""
  # httpsProxy: ""

  # initContainerImage: rjkernick/alpine-wget:latest
  # initSysctlContainerImage: busybox:1.31
  # initCertsContainerImage: adoptopenjdk/openjdk11:alpine
  # initTestContainerImage: dduportal/bats:0.4.0
  # deleteDefaultPlugins: true
  resources: {}
  # We allow the plugins init container to have a separate resources declaration because
  # the initContainer does not take as much resources.

# A custom sonar.properties file can be provided via dictionary.
# For example:
# sonarProperties:
#   sonar.forceAuthentication: true
#   sonar.security.realm: LDAP
#   ldap.url: ldaps://organization.com

# Additional sonar properties to load from a secret with a key "secret.properties" (must be a string)
# sonarSecretProperties:

# Kubernetes secret that contains the encryption key for the sonarqube instance.
# The secret must contain the key 'sonar-secret.txt'.
# The 'sonar.secretKeyPath' property will be set automatically.
# sonarSecretKey: "settings-encryption-secret"

## JDBC Database Type; by default postgresql. To use a different Database type, adjust
jdbcDatabaseType: postgresql

## Override JDBC URL
# jdbcUrlOverride: "jdbc:postgresql://myPostgress/myDatabase;socketTimeout=1500"

## Configuration values for postgresql dependency
## ref: https://github.com/kubernetes/charts/blob/master/stable/postgresql/README.md
postgresql:
  # Enable to deploy the PostgreSQL chart
  enabled: true
  # To use an external PostgreSQL instance, set enabled to false and uncomment
  # the line below:
  # postgresqlServer: ""
  # To use an external secret for the password for an external PostgreSQL
  # instance, set enabled to false and provide the name of the secret on the
  # line below:
  # existingSecret: ""
  postgresqlUsername: "sonarUser"
  postgresqlPassword: "sonarPass"
  postgresqlDatabase: "sonarDB"
  # Specify the TCP port that PostgreSQL should use
  service:
    port: 5432

# Additional labels to add to the pods:
# podLabels:
#   key: value
podLabels: {}
# For compatibility with 8.0 replace by "/opt/sq"
# For compatibility with 8.2, leave the default. They changed it back to /opt/sonarqube
sonarqubeFolder: /opt/sonarqube

enableTests: true

serviceAccount:
  create: false
  # name:
  ## Annotations for the Service Account
  annotations: {}

# extraConfig is used to load Environment Variables from secrets and configmaps
# which may have been written by other tools, such as external orchestrators.
#
# These Secrets/ ConfigMaps are expecetd to contain Key/ Value pairs, such as:
#
# apiVersion: v1
# kind: ConfigMap
# metadata:
#   name: external-sonarqube-opts
# data:
#   SONARQUBE_JDBC_USERNAME: foo
#   SONARQUBE_JDBC_URL: jdbc:postgresql://db.example.com:5432/sonar
#
# These vars can then be injected into the environment by uncommenting the following:
#
# extraConfig:
#   configmaps:
#     - external-sonarqube-opts

extraConfig:
  secrets: []
  configmaps: []
EOF
install helm chart, mình sẽ đặt tên chart là sonar, cài vào namespace sonarqube:
helm repo add oteemocharts https://oteemo.github.io/charts
helm install --name sonar oteemocharts/sonarqube --namespace sonarqube --values sonarqube-values.yaml
Giả sử nếu bạn muốn upgrade helm chart trên:
helm upgrade sonar oteemocharts/sonarqube --namespace sonarqube -f sonarqube-values.yaml
Nếu muốn delete chart trên:
helm delete --purge sonar
logs:
k get pods,svc,ing -n sonarqube
NAME                                   READY   STATUS    RESTARTS   AGE
pod/sonar-postgresql-0                 1/1     Running   0          6m36s
pod/sonar-sonarqube-6cf557759c-6zlqf   1/1     Running   0          47h

NAME                                TYPE        CLUSTER-IP     EXTERNAL-IP   PORT(S)    AGE
service/sonar-postgresql            ClusterIP   10.68.81.62    <none>        5432/TCP   2d18h
service/sonar-postgresql-headless   ClusterIP   None           <none>        5432/TCP   2d18h
service/sonar-sonarqube             ClusterIP   10.68.76.133   <none>        9000/TCP   2d18h

NAME                                 HOSTS                               ADDRESS     PORTS     AGE
ingress.extensions/sonar-sonarqube   sonarqube.your-subdomain.your-domain.net   10.0.16.6   80, 443   2d18h
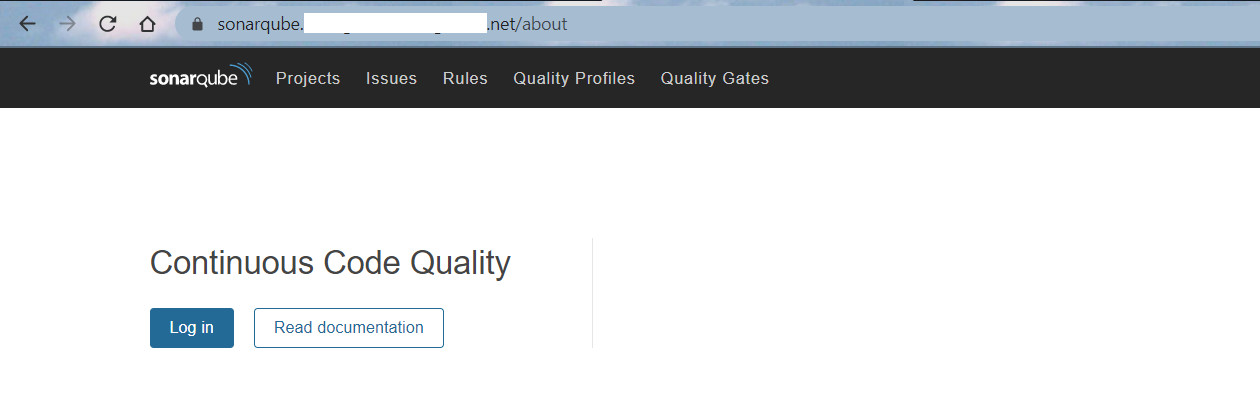
Vào link sonarqube.your-subdomain.your-domain.net sẽ thấy có HTTPS do mình sử dụng TLS đã đc issue thành công từ trước:
Đăng nhập vào Sonarqube với account default là admin/admin rồi đổi pass cho Admin nhé
3. Setup Maven project using Spring Boots vào cluster
Giờ mình sẽ tạo 1 app microservices gồm 2 services:
- spring app,
- postgres
Bắt đầu nào!
Tạo namespace cho app:
kubectl create ns spring-app
Đánh label app=kubed cho namespace spring-app:
kubectl label namespace spring-app app=kubed
Annotate để secret mình muốn sẽ sync sang các namespace có label app=kubed:
kubectl annotate secret ${TLS_SECRET_NAME} -n default kubed.appscode.com/sync="app=kubed"
Annotate domain sẽ dùng cho SpringApp vào Ingress nginx đã tạo:
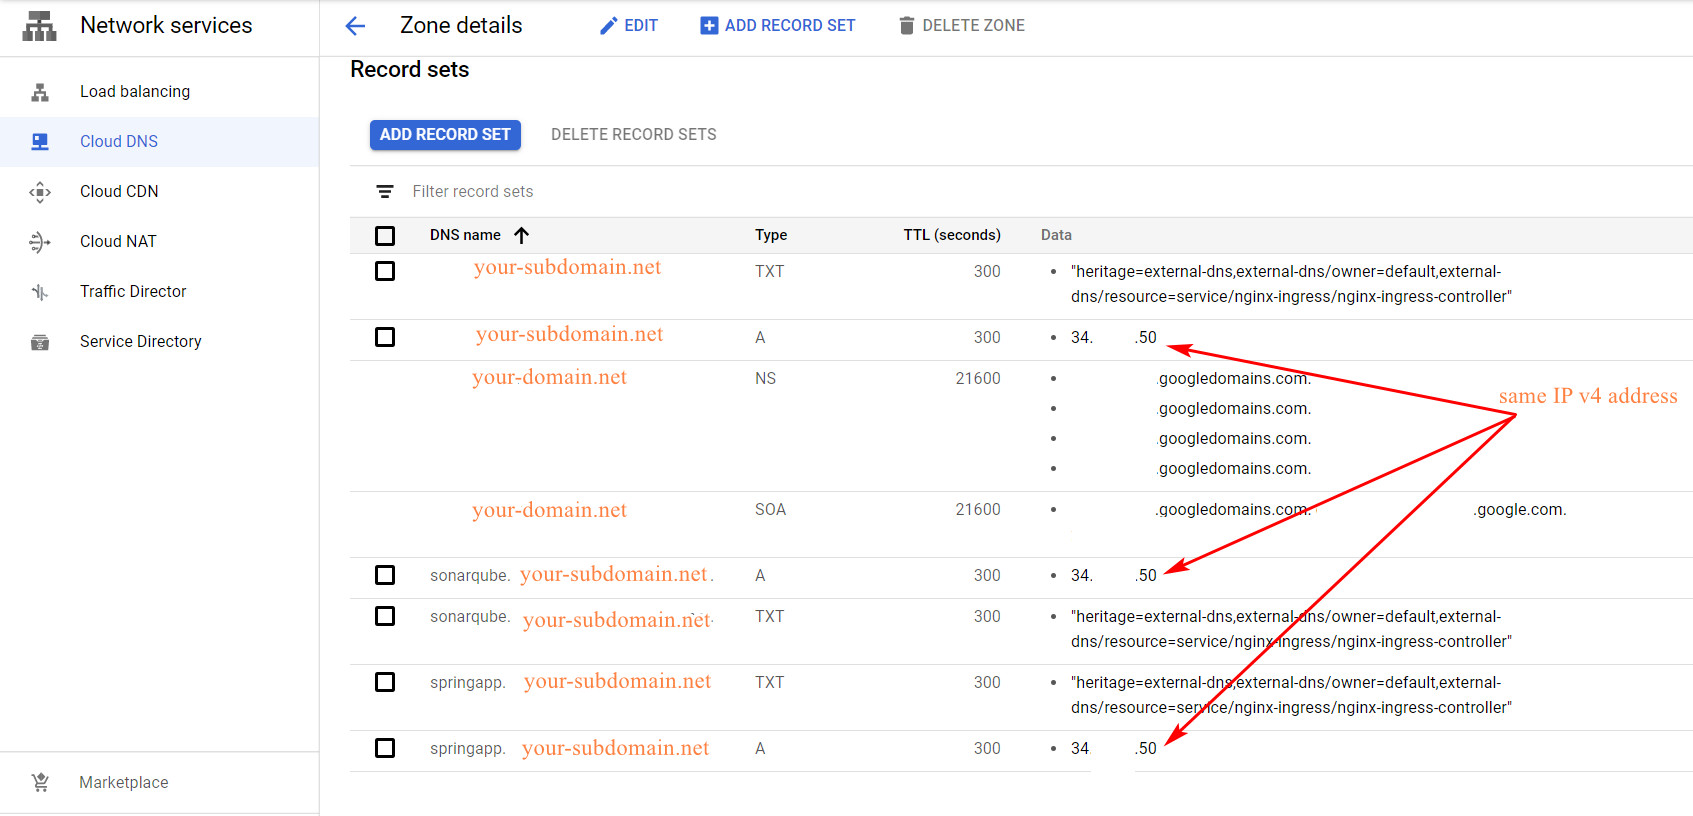
kubectl annotate service nginx-ingress-controller "external-dns.alpha.kubernetes.io/hostname=${SPRINGAPP_SUBDOMAIN}.,${SONAR_SUBDOMAIN}.,${SUBDOMAIN}." -n nginx-ingress --overwrite
Trên Cloud DNS sẽ thấy hiện ra A record mới cho springapp.your-subdomain.your-domain.net,
confirm rằng nó dùng chung 1 IP với $SPRINGAPP_SUBDOMAIN và $SUBDOMAIN là ok!
clone project sau về từ Github:
git clone https://github.com/hoangmnsd/spring-maven-postgres-docker
cd spring-maven-postgres-docker
# tạo folder resource-manifest chứa k8s template
mkdir -p resource-manifest && cd resource-manifest
###1 tạo file docker_postgres-deployment.yaml:
Chú ý file này mình sử dụng image image: hoangmnsd/docker_postgres là image trên DockerHub của mình, các bạn nên tham khảo bài K8S 4 này để tự tạo image riêng của các bạn:
K8S 4
cat > ./docker_postgres-deployment.yaml <<EOF
apiVersion: apps/v1
kind: Deployment
metadata:
  name: docker-postgres
  labels:
    app: docker-postgres
spec:
  selector:
     matchLabels:
       app: docker-postgres
  replicas: 1
  minReadySeconds: 15
  strategy:
    type: RollingUpdate
    rollingUpdate:
      maxUnavailable: 1
      maxSurge: 1
  template:
    metadata:
      labels:
        app: docker-postgres
    spec:
      containers:
        - image: hoangmnsd/docker_postgres
          env:
          - name: POSTGRES_USER
            value: dbuser
          - name: POSTGRES_PASSWORD
            value: password
          - name: POSTGRES_DB
            value: store
          imagePullPolicy: Always
          name: docker-postgres
          ports:
            - containerPort: 5432
EOF
###2 tạo file docker_postgres-service.yaml:
cat > ./docker_postgres-service.yaml <<EOF
apiVersion: v1
kind: Service
metadata:
  name: docker-postgres
spec:
  ports:
    - port: 5432
      protocol: TCP
      targetPort: 5432
  selector:
    app: docker-postgres
EOF
###3 tạo file docker_spring-boot-containers-deployment.yaml:
Chú ý file này mình sử dụng image image: hoangmnsd/docker_spring-boot-containers là image trên DockerHub của mình, các bạn nên tham khảo bài K8S 4 này để tự tạo image riêng của các bạn:
K8S 4
cat > ./docker_spring-boot-containers-deployment.yaml <<EOF
apiVersion: apps/v1
kind: Deployment
metadata:
  name: docker-spring-boot-containers
  labels:
    app: docker-spring-boot-containers
spec:
  selector:
    matchLabels:
      app: docker-spring-boot-containers
  replicas: 1
  minReadySeconds: 15
  strategy:
    type: RollingUpdate
    rollingUpdate:
      maxUnavailable: 1
      maxSurge: 1
  template:
    metadata:
      labels:
        app: docker-spring-boot-containers
    spec:
      containers:
        - image: hoangmnsd/docker_spring-boot-containers
          imagePullPolicy: Always
          name: docker-spring-boot-containers
          ports:
            - containerPort: 12345
EOF
###4 tạo file docker_spring-boot-containers-service.yaml:
cat > ./docker_spring-boot-containers-service.yaml <<EOF
apiVersion: v1
kind: Service
metadata:
  name: docker-spring-boot-containers
spec:
  ports:
  - port: 80
    protocol: TCP
    targetPort: 12345
  selector:
    app: docker-spring-boot-containers
EOF
###5 tạo file docker_spring-boot-containers-ingress.yaml:
File này sẽ sử dụng ${SPRINGAPP_SUBDOMAIN} và ${TLS_SECRET_NAME}
cat > ./docker_spring-boot-containers-ingress.yaml <<EOF
apiVersion: extensions/v1beta1
kind: Ingress
metadata:
  name: spring-app-ingress
  annotations:
    kubernetes.io/ingress.class: "nginx"
spec:
  tls:
  - hosts:
    - ${SPRINGAPP_SUBDOMAIN}
    secretName: ${TLS_SECRET_NAME}
  rules:
  - host: ${SPRINGAPP_SUBDOMAIN}
    http:
      paths:
      - path: /
        backend:
          serviceName: docker-spring-boot-containers
          servicePort: 12345
EOF
Vừa rồi chúng ta đã tạo xong 5 K8S template cần thiết,
Giờ sẽ apply để tạo các k8s resource của SpringApp trên:
kubectl apply -n spring-app -f docker_postgres-deployment.yaml
kubectl apply -n spring-app -f docker_postgres-service.yaml
kubectl apply -n spring-app -f docker_spring-boot-containers-deployment.yaml
kubectl apply -n spring-app -f docker_spring-boot-containers-service.yaml
kubectl apply -n spring-app -f docker_spring-boot-containers-ingress.yaml
Bạn sẽ thấy trong namespace spring-app đã tạo ra các resource sau:
k get pods,svc,ing -n spring-app
NAME                                                 READY   STATUS    RESTARTS   AGE
pod/docker-postgres-cddbcc96f-84smg                  1/1     Running   0          2d
pod/docker-spring-boot-containers-6fbcdb989c-cjj5b   1/1     Running   0          2d

NAME                                    TYPE        CLUSTER-IP      EXTERNAL-IP   PORT(S)    AGE
service/docker-postgres                 ClusterIP   10.68.68.157    <none>        5432/TCP   3d4h
service/docker-spring-boot-containers   ClusterIP   10.68.242.118   <none>        80/TCP     3d6h

NAME                                    HOSTS                               ADDRESS     PORTS     AGE
ingress.extensions/spring-app-ingress   springapp.your-subdomain.your-domain.net   10.0.16.6   80, 443   3d4h
Test SpringApp có hoạt động đúng ko?
Sử dụng Postman, gửi POST request đến https://springapp.your-subdomain.your-domain.net/v1/product với body:
{"name":"product001"}
Chú ý là body của request cần set là raw và JSON: (ảnh)
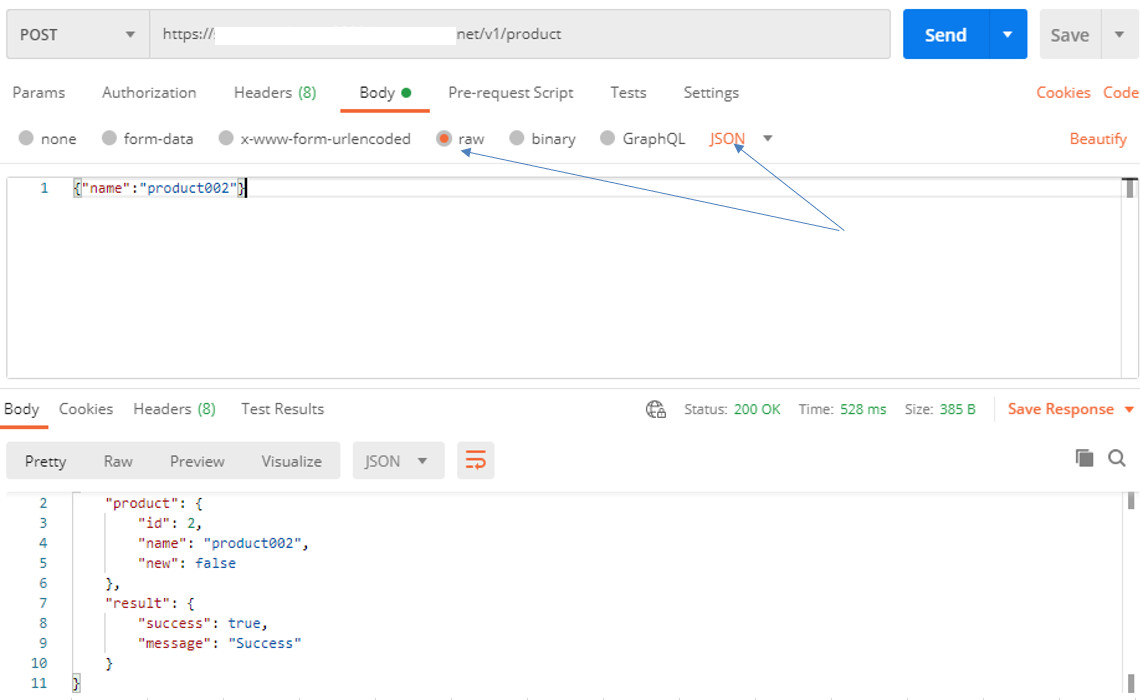
if success, Postman sẽ trả về response dạng này:
{
    "product": {
        "id": 1,
        "name": "product001",
        "new": false
    },
    "result": {
        "success": true,
        "message": "Success"
    }
}
In Browser, check this link https://springapp.your-subdomain.your-domain.net/v1/product/product001
if success browser sẽ trả về chuỗi này:
{"product":{"id":1,"name":"product001","new":false},"result":{"success":true,"message":"Success"}}
(ảnh)

4. Setup Gitlab Runner
Làm theo bài này, để tạo ra được Gitlab Runner thôi nhé:
K8S 13
Chú ý là GITLAB_URL thì để là gitlab.com, cho đỡ tốn tiền, vì dựng cả Gitlab self-hosted sẽ tốn nhiều k8s resource
5. Generate a token of Sonarqube
Login vào Sonarqube, tạo token của User như ảnh sau là ok:
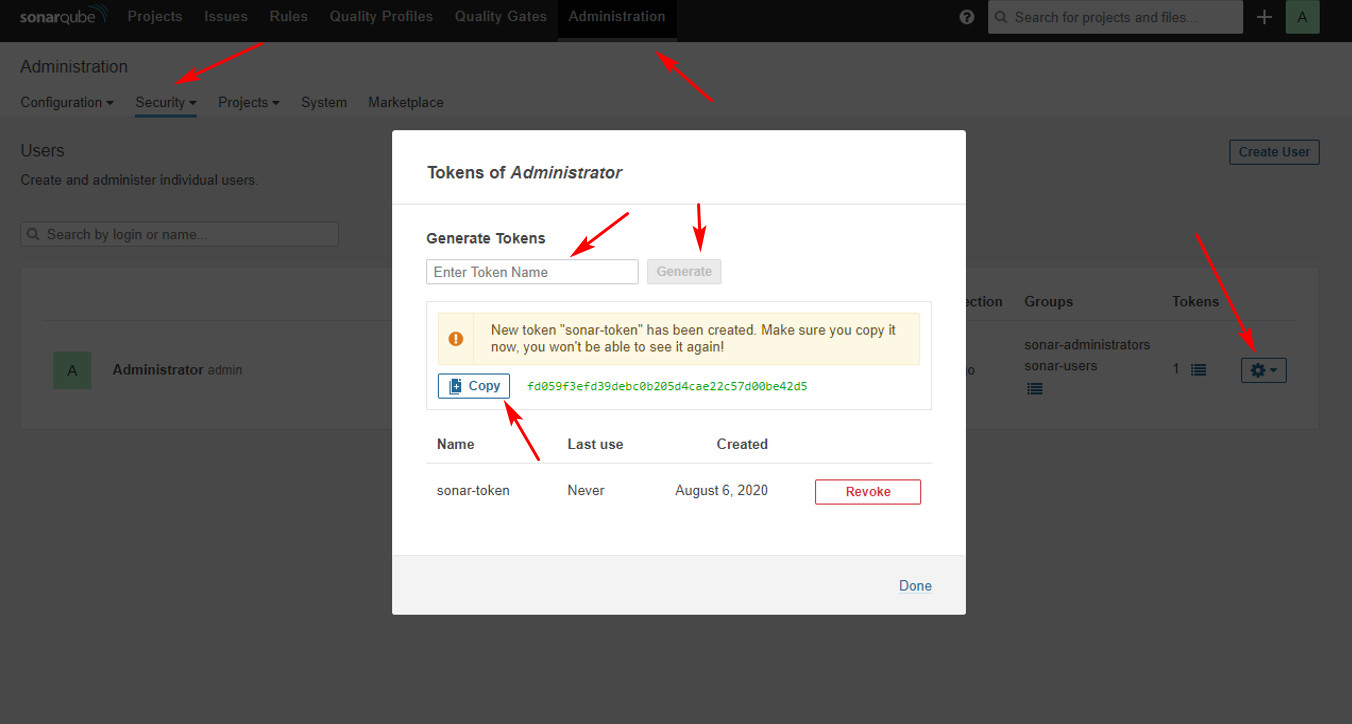
giả sử bạn đã copy được sonar-token như sau: fd059f3efd39debc0b205d4cae22c57d00be42d5
export SONAR_TOKEN="fd059f3efd39debc0b205d4cae22c57d00be42d5"
6. Create empty project on Gitlab and push source from local
Login vào gitlab.com, tạo 1 project rỗng tên là spring-maven-postgres-docker-k8s:
![]()
Còn nhớ ở bước 3, chúng ta đã clone 1 project spring-maven-postgres-docker từ Github về CloudShell,
giờ sẽ push nội dung trong project đó lên project của Gitlab nhé:
cd spring-maven-postgres-docker
# thay <GITLAB-USER> bằng user của bạn
git remote origin set-url https://gitlab.com/<GITLAB-USER>/spring-maven-postgres-docker-k8s.git
git add .
git commit -m "add files"
git push origin master
Tạo file gitlab-ci.yml:
cd spring-maven-postgres-docker
cat > ./gitlab-ci.yml <<EOF
image: docker:latest

services:
  - docker:18.09.7-dind

variables:
  # DOCKER_HOST: tcp://127.0.0.1:2375 # When using Gitlab self-hosted on K8s
  DOCKER_HOST: tcp://docker:2375/ # When using Gitlab.com
  DOCKER_DRIVER: overlay
  DOCKER_API_VERSION: "1.39"
  SONAR_URL: "${SONAR_SUBDOMAIN}"
  SONAR_TOKEN: "${SONAR_TOKEN}"

stages:
  - test
  - build
  - publish

sonarqube_master_job:
  stage: test
  only:
    - master
  image: maven:3.3.9-jdk-8-alpine
  script:
    # - mvn --batch-mode verify sonar:sonar -Dsonar.host.url=$SONAR_URL -Dsonar.login=$SONAR_TOKEN
    - mvn clean package sonar:sonar -Dsonar.host.url=$SONAR_URL -Dsonar.login=$SONAR_TOKEN

build_artifacts:
  stage: build
  only:
    - master
  image: maven:3.3.9-jdk-8-alpine
  script:
    - mvn clean package
  artifacts:
    paths:
      - target/*.jar

publish_docker_images:
  stage: publish
  only:
    - master
  # before_script:
    # # Login to Google Cloud Registry
    # - echo $GCLOUD_SERVICE_KEY | docker login -u _json_key --password-stdin https://gcr.io
  script:
    # # Build docker images from `Dockerfile` and artifact of above steps `build-artifacts`
    - docker build -t springapp .
    # - docker tag $IMAGE_NAME "gcr.io/$GCLOUD_PROJECT_ID/$IMAGE_NAME"
    # - docker push "gcr.io/$GCLOUD_PROJECT_ID/$IMAGE_NAME:latest"
EOF
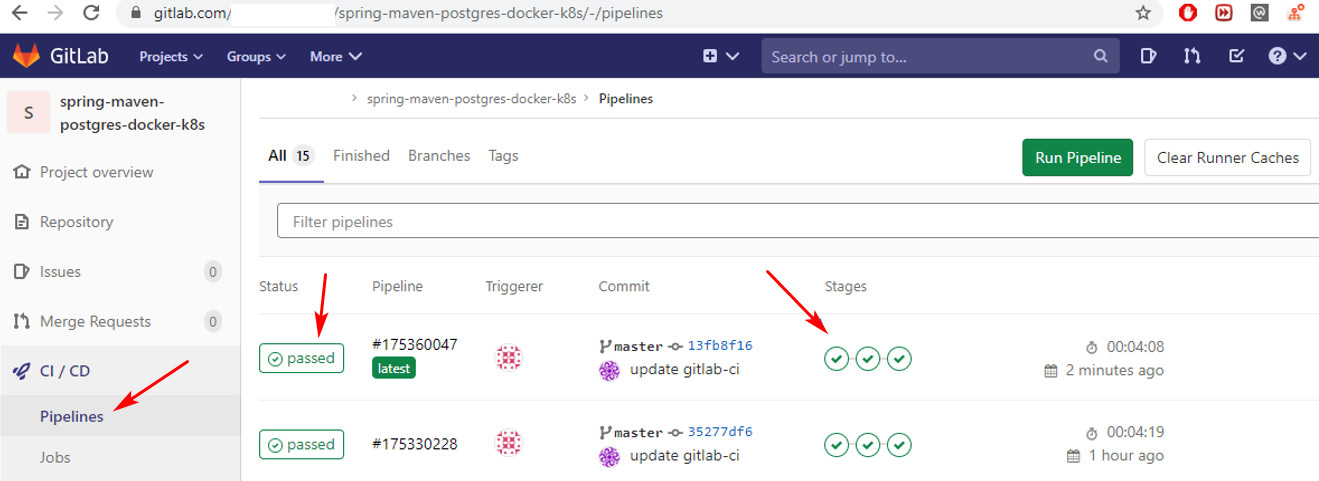
push thay đổi lên Gitlab và check xem pipeline của Gitlab CI có hoạt động tốt không nào.
git add .
git commit -m "update gitlab-ci"
git push origin master
![]()
Như hình sau là OK, cả 3 stage đều passed
có thể ấn vào xem log từng job:
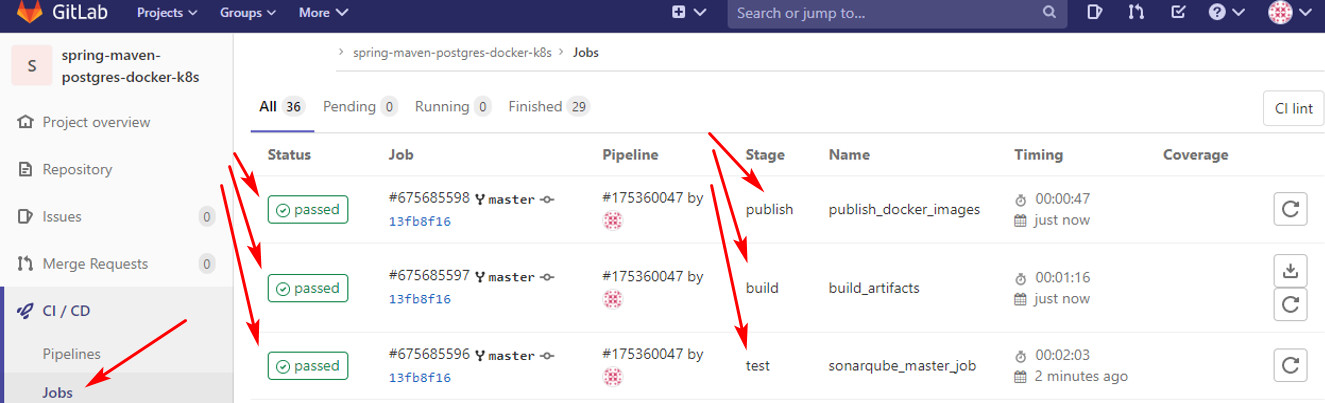
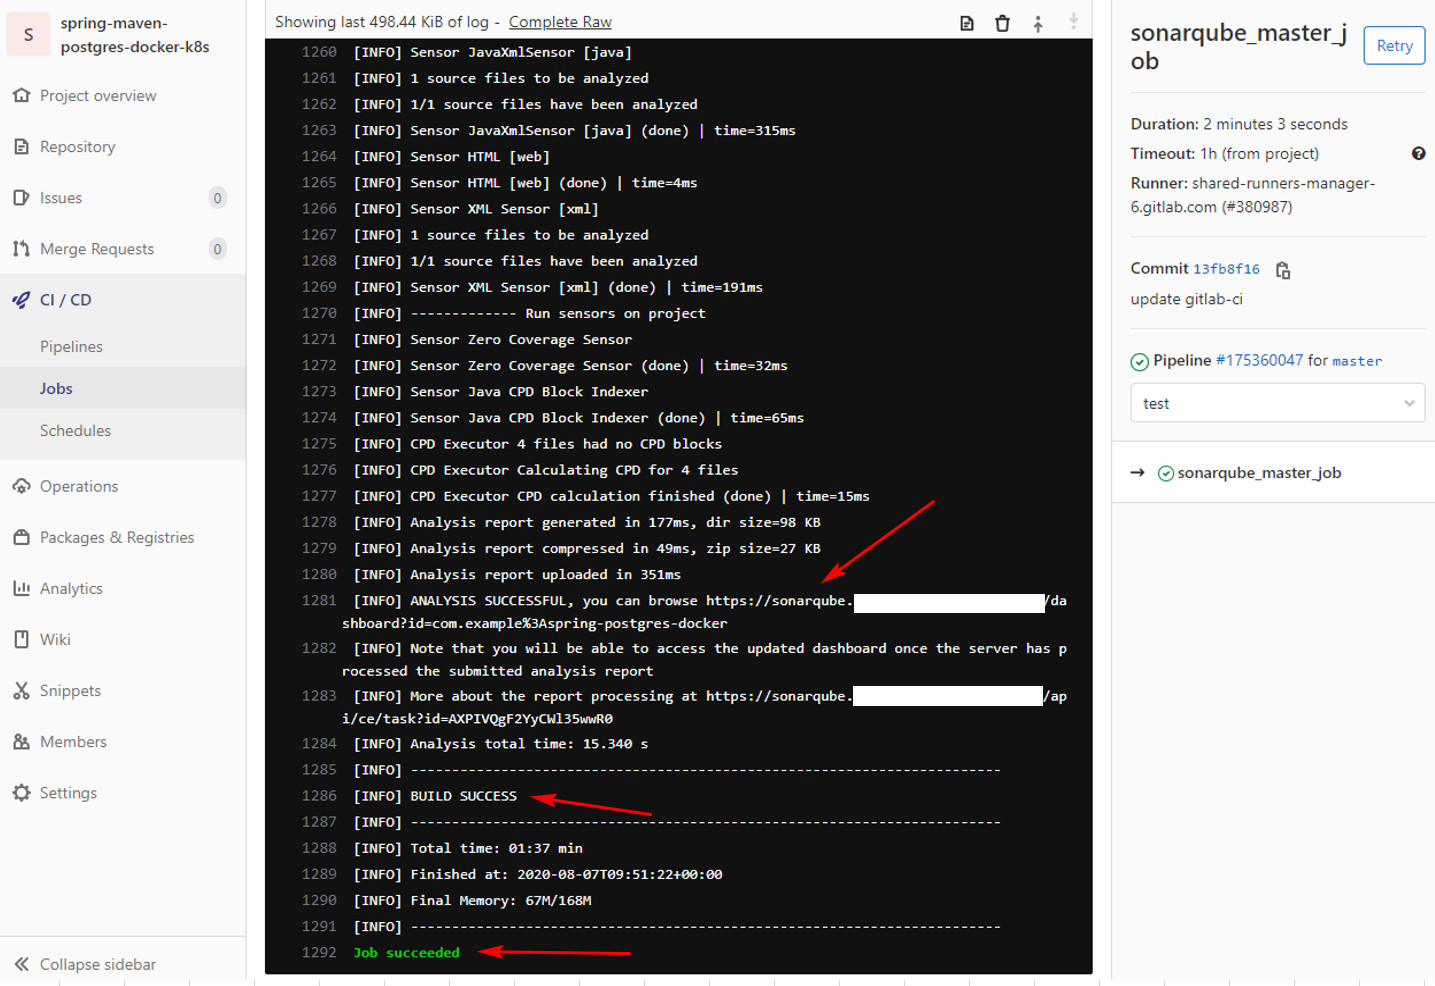
job sonarqube chạy ok và log ra như này:
Vậy là xong, có thể còn nhiều cách sáng tạo và kết hợp khác nhau, nhưng tóm lại cách setup và sử dụng Sonarqube cho project của bạn cũng ko khó khăn lắm đâu, chúc bạn thành công ^^
CREDIT
https://medium.com/@speedforcerun/sonarqube-with-gitlab-ci-setup-stepbystep-java-maven-version-7e131dce0bb1
https://stackoverflow.com/questions/48323223/sonarqube-autorun-with-gitlab
https://github.com/Oteemo/charts/tree/master/charts/sonarqube