K8S 12: GitOps - Using Flux with private Gitlab server and GCR for Continuous Deployment (CD) on GKE Cluster
Lần mò về GitOps thì thấy đây là 1 khái niệm rất hay và thú vị.
Table of Contents
Giới thiệu
Lần mò về GitOps thì thấy đây là 1 khái niệm rất hay và thú vị
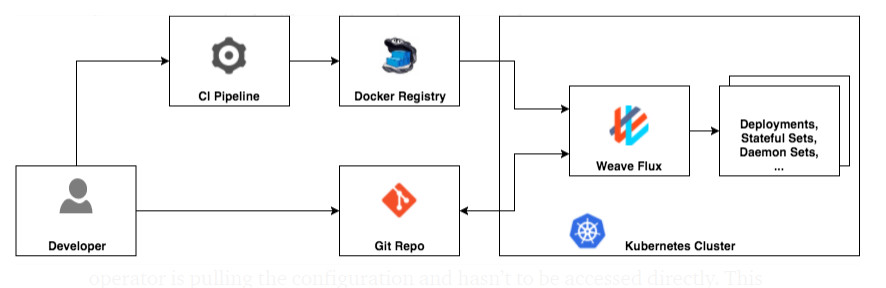
Như các bạn thấy trên hình, Flux hoạt động như 1 operator sẽ đi scan 1 Git repository và 1 (hoặc nhiều) Docker registries.
Mỗi khi bạn commit 1 file yaml lên Git repository đó, Flux sẽ tự động deploy file đó vào k8s (Đây chính là GitOps). Nếu bạn thay đổi nội dung file yaml đó và commit tiếp, Flux cũng sẽ update resources tương ứng. Hoặc khi bạn push 1 images mới lên Container Registry, Flux cũng scan Registry và sẽ update app của bạn sử dụng images mới.
Như vậy, việc centralize mọi thứ trong 1 Git repository giúp bạn dễ dàng audit những thay đổi thông qua các commit của Git. Các kubernetes resources cũng dễ dàng đọc hiểu và chỉnh sửa.
Bài này mình sẽ làm 1 demo về việc sử dụng Weave Flux để setup CD (Continuous Deployment) với Gitlab Server riêng và Private Registry riêng của Google (GCR). Mọi thứ làm trên GCP, GKE (cũng của Google thôi)
Các câu lệnh ở đây đều làm trên CloudShell của GCP nhé
Yêu cầu
Đã làm theo bài sau (Nếu bạn đã có Gitlab server riêng thì có thể bỏ qua):
K8S 10
Sau khi làm theo link trên thì chúng ta có 1 Gitlab server riêng ở domain như sau:
https://gitlab.your-subdomain.your-domain.net/
Chuẩn bị biến môi trường, những biến này sẽ sử dụng để tạo 1 số file ở các phần sau:
export PROJECT_ID="your-project-id"

# Ở đây sẽ là subdomain để route traffic của app Hello World vào nhé,
# nếu ko có cái này cũng ko sao, khi test chúng ta sẽ sử dụng chức năng Web Preview của CloudShell cũng được
export SUBDOMAIN="your-subdomain.your-domain.net"
Cách làm
1. Setting GitOps Repository
Giờ sẽ setting 1 chút trên Gitlab server của bạn:
Tạo user flux với role Admin
Login vào user flux
Tạo personal access token của user flux (https://gitlab.your-subdomain.your-domain.net/profile/personal_access_tokens)
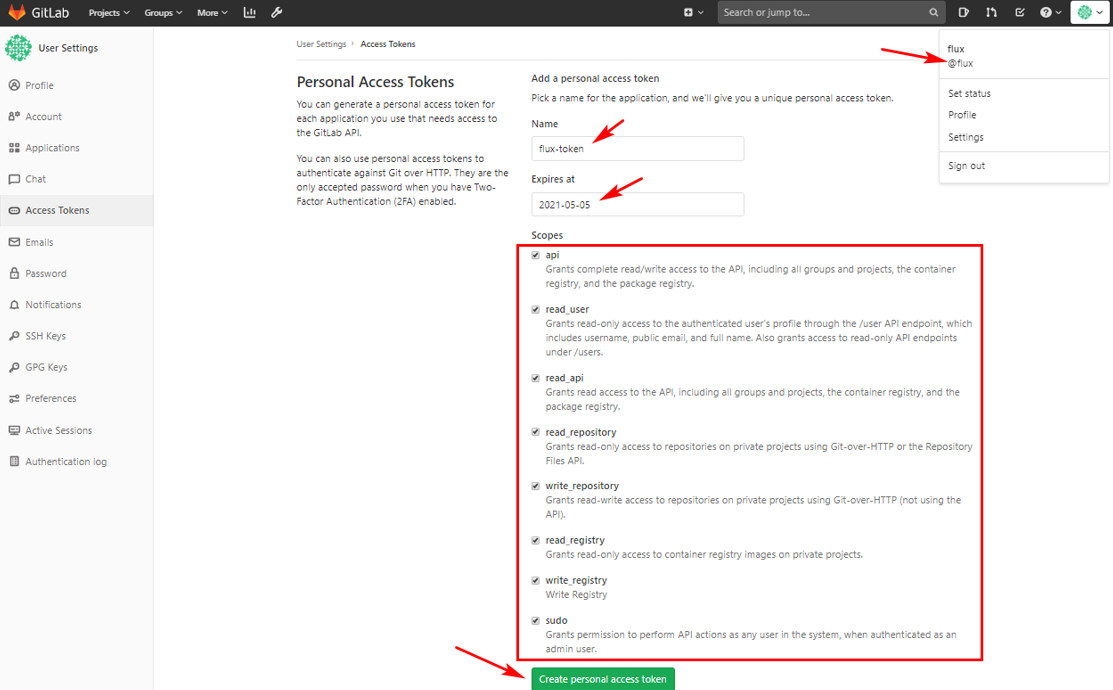
Token có dạng 3KzPQxrkoc6amdQKxAhw, hãy giữ bí mật token này để lát sử dụng sau
Trên CloudShell tạo biến môi trường lưu token vào:
export PERSONAL_ACCESS_TOKEN="3KzPQxrkoc6amdQKxAhw"
Trên Gitlab tạo project để user flux sử dụng làm GitOps repository
Tên project thì tùy ý: đây mình sẽ đặt flux-get-started
Link project sẽ kiểu kiểu như này https://gitlab.your-subdomain.your-domain.net/flux/flux-get-started
Từ CloudShell clone project vừa tạo về:
cd ~
git clone https://gitlab.your-subdomain.your-domain.net/flux/flux-get-started && cd flux-get-started
2. Tạo 1 App sample Hello World App để test
Viết 1 app đơn giản chạy bằng Go (command sau sẽ tạo ra file main.go)
cat > ./main.go <<EOF
package main

import (
 "fmt"
 "log"
 "net/http"
)

var version = 1

func handler(w http.ResponseWriter, r *http.Request) {
 fmt.Fprintln(w, "Hello 世界... from v %s", version)
}
func main() {
 http.HandleFunc("/", handler)
 log.Fatal(http.ListenAndServe(":8888", nil))
}
EOF
Tạo Dockerfile và build images riêng của bạn
cat > ./Dockerfile <<EOF
FROM golang:1.11-alpine AS build
WORKDIR /
COPY main.go go.* /
RUN CGO_ENABLED=0 go build -o /bin/demo
FROM scratch
COPY --from=build /bin/demo /bin/demo
ENTRYPOINT ["/bin/demo"]
EOF
Build image từ Dockerfile trên
docker image build -t helloapp:latest .
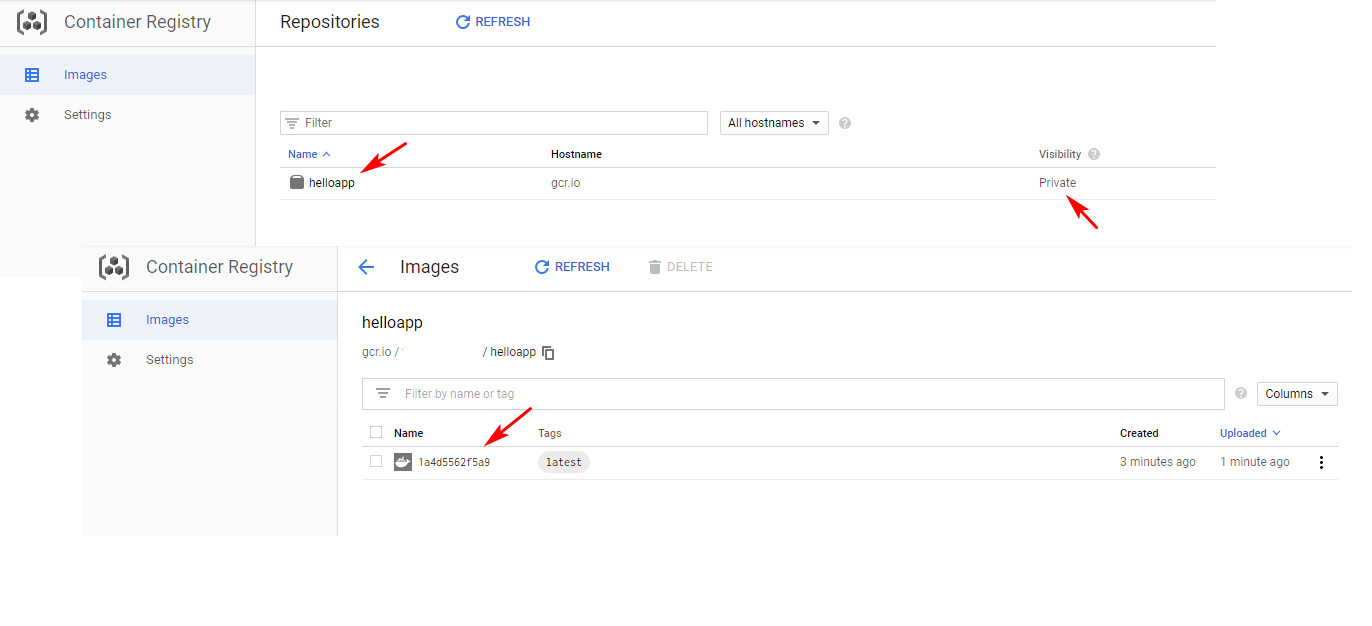
Confirm rằng images đã được tạo ra
docker images
REPOSITORY          TAG                 IMAGE ID            CREATED              SIZE
helloapp            latest              c06c85757d4e        About a minute ago   6.51MB
<none>              <none>              9c7ddef38ecb        About a minute ago   325MB
golang              1.11-alpine         e116d2efa2ab        9 months ago         312MB
Đánh tag cho images đó
docker tag helloapp:latest gcr.io/${PROJECT_ID}/helloapp:latest
Push images có tag latest đó lên GCR của bạn
docker push gcr.io/${PROJECT_ID}/helloapp:latest
file hello-app.yaml bao gồm k8s Service và Deployment resources
cat > ./hello-app.yaml <<EOF
apiVersion: v1
kind: Service
metadata:
  name: hello
spec:
  ports:
  - port: 80
    targetPort: 8888
  selector:
    app: hello

---
apiVersion: apps/v1
kind: Deployment
metadata:
  name: hello
spec:
  selector:
    matchLabels:
      app: hello
  replicas: 1
  template:
    metadata:
      labels:
        app: hello
    spec:
      containers:
      - name: hello
        image: gcr.io/${PROJECT_ID}/helloapp:latest
        ports:
        - containerPort: 8888
EOF
file hello-ingress.yaml chứa Ingress giúp route traffic từ 1 subdomain cụ thể vào service của Hello App
Nếu các bạn ko muốn tạo file này cũng ko sao, khi test app chúng ta sẽ sử dụng chức năng Web Preview của CloudShell
cat > ./hello-ingress.yaml <<EOF
apiVersion: extensions/v1beta1
kind: Ingress
metadata:
  name: hello-ingress
  annotations:
    kubernetes.io/ingress.class: "nginx"
spec:
  rules:
  - host: ${SUBDOMAIN}
    http:
      paths:
      - path: /
        backend:
          serviceName: hello
          servicePort: 80
EOF
Từ CloudShell bạn hãy push 2 file hello-app.yaml và hello-ingress.yaml lên project flux-get-started
cd ~/flux-get-started
git add hello-app.yaml hello-ingress.yaml
git commit "Commit yaml files"
git push origin master
2. Install Flux
# Add the Flux repo:
helm repo add fluxcd https://charts.fluxcd.io
# Trong Cluster tạo namespace `flux`:
kubectl create namespace flux
# Tạo Secret trong k8s Cluster bằng personal access token đã tạo ở step 1:
kubectl create secret generic flux-git-auth --namespace flux --from-literal=GIT_AUTHUSER=flux --from-literal=GIT_AUTHKEY=${PERSONAL_ACCESS_TOKEN}
Install flux, chú ý sửa link đến Gitlab Server của bạn:
helm upgrade -i flux fluxcd/flux \
--set git.url='https://$(GIT_AUTHUSER):$(GIT_AUTHKEY)@gitlab.your-subdomain.your-domain.net/flux/flux-get-started.git' \
--set env.secretName=flux-git-auth \
--namespace flux
3. Test
Sau khi install flux thành công, bạn sẽ nhận ra là có 1 pod và 1 svc và 1 ingress được tạo ra, đó chính là các resource để trên GitOps repository của bạn
k get pods,svc -A
NAMESPACE       NAME                                                    READY   STATUS      RESTARTS   AGE
default         hello-54d49c4bb5-hm9z6                                  1/1     Running     0          36s
flux            flux-7b88d998fd-zclth                                   1/1     Running     0          60s
flux            flux-memcached-64f7865494-xq46b                         1/1     Running     0          60s

NAMESPACE       NAME                                      TYPE           CLUSTER-IP      EXTERNAL-IP    PORT(S)                                   AGE                                 140m
default         hello                                     ClusterIP      10.68.71.230    <none>         80/TCP                                    79s
default         kubernetes                                ClusterIP      10.68.0.1       <none>         443/TCP                                   151m
flux            flux                                      ClusterIP      10.68.188.216   <none>         3030/TCP                                  103s
flux            flux-memcached                            ClusterIP      10.68.74.32     <none>         11211/TCP                                 103s
Giờ truy cập vào website your-subdomain.your-domain.net sẽ thấy app của bạn đã được apply tự động
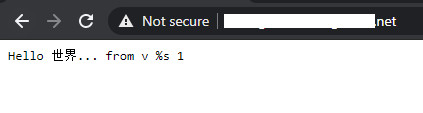
Hoặc cũng có thể bạn dùng chức năng Web Preview của ClouShell để view web app:
kubectl port-forward pod/hello-54d49c4bb5-hm9z6 8888:8888
3.1. Flux tự động scan GitOps Repository để update application
Giờ hãy thử thay đổi file yaml để xem Flux có tự động phản ánh những thay đổi đó vào Kubernetes cho bạn ko
Trước tiên hãy sửa version = 2 trong file main.go, rồi build lại 1 Docker images với tag :0.2.0 và push lên GCR
nano main.go
# change `version = 2`

# Build lại Docker images và đánh tag 0.2.0
docker image build -t helloapp:0.2.0 .

# tag cho images trên GCR là 0.2.0
docker tag helloapp:0.2.0 gcr.io/${PROJECT_ID}/helloapp:0.2.0

# Push images mới với tag :0.2.0 lên GCR
docker push gcr.io/${PROJECT_ID}/helloapp:0.2.0
Sau đó bạn sẽ sửa image trong file hello-app.yaml thành dùng image tag :0.2.0:
OLD
~~~
image: gcr.io/YOUR_PROJECT_ID/helloapp:latest
~~~
NEW
~~~
image: gcr.io/YOUR_PROJECT_ID/helloapp:0.2.0
~~~
rồi commit và push thay đổi trên lên GitOps repository của bạn:
git add hello-app.yaml
git commit -m "change to using image :0.2.0"
git push origin master
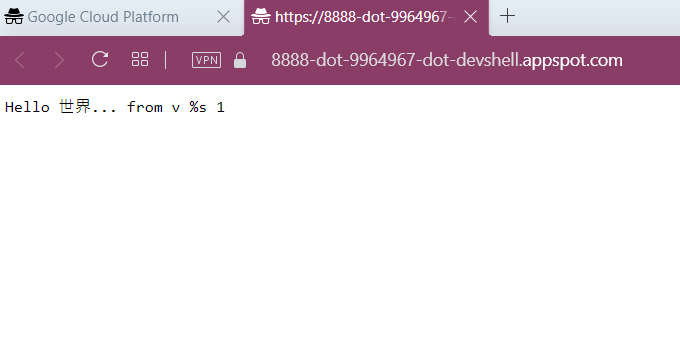
Vài phút sau bạn sẽ thấy 1 pod mới của hello app được tạo lên, pod cũ bị xóa đi
k get pods -A
NAMESPACE       NAME                                                    READY   STATUS      RESTARTS   AGE
default         hello-5856bc89cd-rdrdd                                  1/1     Running     0          37s
Vào check app trên giao diện:

⇒ Như vậy nghĩa là Flux đã tự động apply file yaml mới cho chúng ta rồi!
3.2. Flux tự động scan Registry để update application
Trước hết để làm điều này thì cần phải add annotation vào Deployment đã
Sửa file hello-app.yaml add thêm dòng sau vào
  annotations:
    flux.weave.works/automated: "true"
    flux.weave.works/tag.chart-image: semver:~0.2
cat > ./hello-app.yaml <<EOF
apiVersion: v1
kind: Service
metadata:
  name: hello
spec:
  ports:
  - port: 80
    targetPort: 8888
  selector:
    app: hello

---
apiVersion: apps/v1
kind: Deployment
metadata:
  name: hello
  annotations:
    flux.weave.works/automated: "true"
    flux.weave.works/tag.chart-image: semver:~0.2
spec:
  selector:
    matchLabels:
      app: hello
  replicas: 1
  template:
    metadata:
      labels:
        app: hello
    spec:
      containers:
      - name: hello
        image: gcr.io/${PROJECT_ID}/helloapp:0.2.0
        ports:
        - containerPort: 8888
EOF
rồi commit và push thay đổi trên lên GitOps repository của bạn:
git add hello-app.yaml
git commit -m "add annotation using semver"
git push origin master
Giờ bạn thấy app của bạn chưa có gì thay đổi, vẫn là app version cũ nhé
Giả sử vì 1 lý do gì đó, bạn cần upgrade version của app lên 0.2.2,
sửa version = 2.2 trong file main.go, rồi build lại 1 Docker images với tag :0.2.2 và push lên GCR
nano main.go
# change version to `2.2`

# Build lại Docker images và đánh tag 0.2.2
docker image build -t helloapp:0.2.2 .

# tag cho images trên GCR là 0.2.2
docker tag helloapp:0.2.2 gcr.io/${PROJECT_ID}/helloapp:0.2.2

# Push images mới với tag :0.2.2 lên GCR
docker push gcr.io/${PROJECT_ID}/helloapp:0.2.2
Gần như ngay lập tức, bạn sẽ thấy 1 pod mới của Hello App được tạo lên, pod cũ bị xóa đi, webapp cũng thay đổi giao diện tương ứng
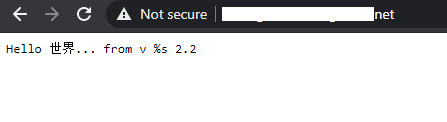
Đấy chính là nhờ các annotation trong file hello-app.yaml, nó giúp Flux tự động apply thay đổi.
Mỗi khi có image mới với tag bắt đầu bằng 0.2.* thì app sẽ được update tự động
Rất thú vị và dễ hiểu phải ko, hãy thử áp dụng Flux xem sao nhé
Done! 🎉🎉
CREDIT
https://medium.com/@m.k.joerg/gitops-weave-flux-in-detail-77ce36945646
https://docs.fluxcd.io/en/1.19.0/tutorials/get-started-helm/
https://github.com/fluxcd/flux/blob/master/chart/flux/values.yaml
https://www.weave.works/blog/managing-helm-releases-the-gitops-way
https://github.com/fluxcd/flux/blob/master/docs/guides/use-private-git-host.md
https://github.com/fluxcd/flux/issues/1358