K8S 3: Using eksctl on Amazon Linux EC2
cách 2 là dùng `eksctl` là CLI của AWS phát triển, nhiệm vụ tương tự như Service EKS, nhưng ta làm việc với nó trên CLI/terminal
Table of Contents
Giới thiệu
Để vọc Kubernetes trên AWS, có nhiều cách:
cách 1 là dùng Service EKS của AWS, làm việc trên Console luôn, rất trực quan
cách 2 là dùng eksctl là CLI của AWS phát triển, nhiệm vụ tương tự như Service EKS, nhưng ta làm việc với nó trên CLI/terminal
cách 3 là tạo 1 EC2 Ubuntu 18.04 LTS (t2.medium trở lên), cài minikube lên nó, dựng 1 cluster
=> cách 1 và 2 khá tốn kém, nhưng bạn có thể dùng full service, gần với môi trường production nhất,
cách 3 thì rẻ hơn nhiều, các bạn chỉ tốn phí duy trì con EC2 Ubuntu thôi, tuy nhiên cách này chỉ nên dùng để vọc vạch, dùng “cho biết” thế nào là k8s thôi 😆
Bài này mình sẽ hướng dẫn cách 2, dùng eksctl, các bài trước đã nói về cách 3 rồi
Chuẩn bị
Launch 1 EC2 Amazon Linux, t2.micro là đủ, ssh vào rồi làm việc
install kubectl
curl -o kubectl https://amazon-eks.s3-us-west-2.amazonaws.com/1.14.6/2019-08-22/bin/linux/amd64/kubectl
chmod +x ./kubectl
mkdir -p $HOME/bin && cp ./kubectl $HOME/bin/kubectl && export PATH=$HOME/bin:$PATH
echo 'export PATH=$HOME/bin:$PATH' >> ~/.bashrc
kubectl version --short --client
install aws-iam-authenticator on Linux
curl -o aws-iam-authenticator https://amazon-eks.s3-us-west-2.amazonaws.com/1.14.6/2019-08-22/bin/linux/amd64/aws-iam-authenticator
chmod +x ./aws-iam-authenticator
mkdir -p $HOME/bin && cp ./aws-iam-authenticator $HOME/bin/aws-iam-authenticator && export PATH=$HOME/bin:$PATH
echo 'export PATH=$HOME/bin:$PATH' >> ~/.bashrc
aws-iam-authenticator help
install eksctl
curl --silent --location "https://github.com/weaveworks/eksctl/releases/download/latest_release/eksctl_$(uname -s)_amd64.tar.gz" | tar xz -C /tmp
sudo mv /tmp/eksctl /usr/local/bin
eksctl version
set default region, và set account Docker Hub
export AWS_DEFAULT_REGION=us-east-1
export DOCKER_USERNAME=AAAAAAA
export DOCKER_PASSWORD=BBBBBBB
export DOCKER_USER_ID=CCCCCC
Use AWS Console, create IAM Role and attach to EC2 with this policy:
{
    "Version": "2012-10-17",
    "Statement": [
        {
            "Sid": "VisualEditor0",
            "Effect": "Allow",
            "Action": [
                "iam:CreateInstanceProfile",
                "iam:DeleteInstanceProfile",
                "iam:GetRole",
                "iam:GetInstanceProfile",
                "iam:ListRoleTags",
                "iam:UntagRole",
                "iam:TagRole",
                "iam:RemoveRoleFromInstanceProfile",
                "iam:CreateRole",
                "iam:DeleteRole",
                "iam:AttachRolePolicy",
                "iam:PutRolePolicy",
                "iam:ListInstanceProfiles",
                "iam:AddRoleToInstanceProfile",
                "iam:ListInstanceProfilesForRole",
                "iam:PassRole",
                "iam:CreateServiceLinkedRole",
                "iam:DetachRolePolicy",
                "iam:DeleteRolePolicy",
                "iam:DeleteServiceLinkedRole",
                "ec2:DeleteInternetGateway",
                "iam:GetOpenIDConnectProvider",
                "iam:GetRolePolicy"
            ],
            "Resource": [
                "arn:aws:iam::793459850633:instance-profile/eksctl-*",
                "arn:aws:iam::*:oidc-provider/*",
                "arn:aws:iam::793459850633:role/eksctl-*",
                "arn:aws:ec2:*:*:internet-gateway/*"
            ]
        },
        {
            "Sid": "VisualEditor1",
            "Effect": "Allow",
            "Action": [
                "ec2:AuthorizeSecurityGroupIngress",
                "ec2:DeleteSubnet",
                "ec2:AttachInternetGateway",
                "ec2:DeleteRouteTable",
                "ec2:AssociateRouteTable",
                "ec2:DescribeInternetGateways",
                "elasticloadbalancing:DescribeLoadBalancers",
                "autoscaling:DescribeAutoScalingGroups",
                "ec2:CreateRoute",
                "ec2:CreateInternetGateway",
                "ec2:RevokeSecurityGroupEgress",
                "autoscaling:UpdateAutoScalingGroup",
                "ec2:DeleteInternetGateway",
                "ec2:DescribeKeyPairs",
                "ec2:DescribeRouteTables",
                "ec2:ImportKeyPair",
                "ec2:DescribeLaunchTemplates",
                "ec2:CreateTags",
                "ec2:CreateRouteTable",
                "cloudformation:*",
                "ec2:RunInstances",
                "ec2:DetachInternetGateway",
                "ec2:DisassociateRouteTable",
                "ec2:RevokeSecurityGroupIngress",
                "ec2:DescribeImageAttribute",
                "ec2:DeleteNatGateway",
                "autoscaling:DeleteAutoScalingGroup",
                "ec2:DeleteVpc",
                "ec2:CreateSubnet",
                "ec2:DescribeSubnets",
                "eks:*",
                "autoscaling:CreateAutoScalingGroup",
                "ec2:DescribeAddresses",
                "ec2:DeleteTags",
                "ec2:CreateNatGateway",
                "autoscaling:DescribeLaunchConfigurations",
                "ec2:CreateVpc",
                "ec2:DescribeVpcAttribute",
                "autoscaling:DescribeScalingActivities",
                "ec2:DescribeAvailabilityZones",
                "ec2:CreateSecurityGroup",
                "ec2:ModifyVpcAttribute",
                "ec2:ReleaseAddress",
                "ec2:AuthorizeSecurityGroupEgress",
                "ec2:DeleteLaunchTemplate",
                "ec2:DescribeTags",
                "ec2:DeleteRoute",
                "ec2:DescribeLaunchTemplateVersions",
                "ec2:DescribeNatGateways",
                "ec2:AllocateAddress",
                "ec2:DescribeSecurityGroups",
                "autoscaling:CreateLaunchConfiguration",
                "ec2:DescribeImages",
                "ec2:CreateLaunchTemplate",
                "autoscaling:DeleteLaunchConfiguration",
                "ec2:DescribeVpcs",
                "ec2:DeleteSecurityGroup"
            ],
            "Resource": "*"
        }
    ]
}
Cách tạo 1 cluster bằng eksctl
Create a file cluster.yaml
apiVersion: eksctl.io/v1alpha5
kind: ClusterConfig

metadata:
  name: base-project
  region: us-east-1

availabilityZones: ["us-east-1a", "us-east-1d"]

nodeGroups:
  - name: nodegrp-1
    instanceType: t2.medium
    desiredCapacity: 1
Apply above config file to create cluster:
eksctl create cluster -f cluster.yaml
chờ khoảng 10 phút vì eks sẽ provision ra network rất tốn time:
more sample template https://github.com/weaveworks/eksctl/blob/master/examples
Get pods, service, nodes, is running
kubectl get pods,svc,node -A
[ec2-user@ip-172-31-84-250 ~]$ kubectl get pods,svc,node -A
NAMESPACE     NAME                              READY   STATUS    RESTARTS   AGE
kube-system   pod/aws-node-6k2qq                1/1     Running   0          3h28m
kube-system   pod/coredns-8455f84f99-rzn44      1/1     Running   0          3h34m
kube-system   pod/coredns-8455f84f99-xw2rv      1/1     Running   0          3h34m
kube-system   pod/kube-proxy-w2t7v              1/1     Running   0          3h28m


NAMESPACE     NAME                     TYPE           CLUSTER-IP       EXTERNAL-IP
              PORT(S)         AGE
default       service/kubernetes       ClusterIP      10.100.0.1       <none>
              443/TCP         3h34m
kube-system   service/kube-dns         ClusterIP      10.100.0.10      <none>
              53/UDP,53/TCP   3h34m


NAMESPACE   NAME                                  STATUS   ROLES    AGE     VERSION
            node/ip-192-168-62-230.ec2.internal   Ready    <none>   3h28m   v1.14.7-eks-1861c5
Run app micro-service on k8s
clone source về
cd ~
git clone https://github.com/hoangmnsd/k8s-mastery
tạo pod frontend:
cd /home/ec2-user/k8s-mastery/resource-manifests
kubectl apply -f sa-frontend-deployment.yaml
sau khi apply thì pods và services, node như sau:
ip-172-31-84-250 ~]$ kubectl get pods,svc,node -A
NAMESPACE     NAME                               READY   STATUS    RESTARTS   AGE
default       pod/sa-frontend-54789d8b7d-2whc4   1/1     Running   0          2m36s
default       pod/sa-frontend-54789d8b7d-dbh4p   1/1     Running   0          2m36s
kube-system   pod/aws-node-7t2df                 1/1     Running   0          9m5s
kube-system   pod/coredns-8455f84f99-w8dlf       1/1     Running   0          15m
kube-system   pod/coredns-8455f84f99-xqk2f       1/1     Running   0          15m
kube-system   pod/kube-proxy-xzhwd               1/1     Running   0          9m5s

NAMESPACE     NAME                 TYPE        CLUSTER-IP    EXTERNAL-IP   PORT(S)         AGE
default       service/kubernetes   ClusterIP   10.100.0.1    <none>        443/TCP         15m
kube-system   service/kube-dns     ClusterIP   10.100.0.10   <none>        53/UDP,53/TCP   15m

NAMESPACE   NAME                                  STATUS   ROLES    AGE    VERSION
            node/ip-192-168-34-208.ec2.internal   Ready    <none>   9m5s   v1.14.7-eks-1861c5

ip-172-31-84-250 ~]$ df -h
Filesystem      Size  Used Avail Use% Mounted on
devtmpfs        483M   60K  483M   1% /dev
tmpfs           493M     0  493M   0% /dev/shm
/dev/xvda1      7.9G  2.8G  5.0G  36% /
tạo service frondend:
kubectl create -f service-sa-frontend-lb.yaml
get services:
kubectl get svc -A
NAMESPACE     NAME             TYPE           CLUSTER-IP     EXTERNAL-IP                                                              PORT(S)         AGE
default       kubernetes       ClusterIP      10.100.0.1     <none>                                                                   443/TCP         21m
default       sa-frontend-lb   LoadBalancer   10.100.64.73   a40ec71f8061811ea91b70a830ca64b1-169405131.us-east-1.elb.amazonaws.com   80:31360/TCP    102s
kube-system   kube-dns         ClusterIP      10.100.0.10    <none>                                                                   53/UDP,53/TCP   21m
check frontend app trên LB URL: a40ec71f8061811ea91b70a830ca64b1-169405131.us-east-1.elb.amazonaws.com
Tạo pod và service của backend logic:
cd /home/ec2-user/k8s-mastery/resource-manifests
kubectl apply -f sa-logic-deployment.yaml --record
kubectl apply -f service-sa-logic.yaml
get pods, svc:
ip-172-31-84-250 resource-manifests]$ kubectl get pods,svc -A
NAMESPACE     NAME                               READY   STATUS    RESTARTS   AGE
default       pod/sa-frontend-54789d8b7d-2whc4   1/1     Running   0          19m
default       pod/sa-frontend-54789d8b7d-dbh4p   1/1     Running   0          19m
default       pod/sa-logic-7d7ff8f6dc-r9tcz      1/1     Running   0          118s
default       pod/sa-logic-7d7ff8f6dc-zhwv2      1/1     Running   0          118s
kube-system   pod/aws-node-7t2df                 1/1     Running   0          25m
kube-system   pod/coredns-8455f84f99-w8dlf       1/1     Running   0          31m
kube-system   pod/coredns-8455f84f99-xqk2f       1/1     Running   0          31m
kube-system   pod/kube-proxy-xzhwd               1/1     Running   0          25m

NAMESPACE     NAME                     TYPE           CLUSTER-IP     EXTERNAL-IP                                                              PORT(S)         AGE
default       service/kubernetes       ClusterIP      10.100.0.1     <none>                                                                   443/TCP         31m
default       service/sa-frontend-lb   LoadBalancer   10.100.64.73   a40ec71f8061811ea91b70a830ca64b1-169405131.us-east-1.elb.amazonaws.com   80:31360/TCP    11m
default       service/sa-logic         ClusterIP      10.100.97.45   <none>                                                                   80/TCP          4s
kube-system   service/kube-dns         ClusterIP      10.100.0.10    <none>                                                                   53/UDP,53/TCP   31m
Tạo pod và service của backend webapp:
cd /home/ec2-user/k8s-mastery/resource-manifests
kubectl apply -f sa-web-app-deployment.yaml --record
kubectl apply -f service-sa-web-app-lb.yaml
get pods,svc:
ip-172-31-84-250 resource-manifests]$ kubectl get pods,svc -A
NAMESPACE     NAME                               READY   STATUS    RESTARTS   AGE
default       pod/sa-frontend-54789d8b7d-2whc4   1/1     Running   0          21m
default       pod/sa-frontend-54789d8b7d-dbh4p   1/1     Running   0          21m
default       pod/sa-logic-7d7ff8f6dc-r9tcz      1/1     Running   0          4m8s
default       pod/sa-logic-7d7ff8f6dc-zhwv2      1/1     Running   0          4m8s
default       pod/sa-web-app-5f7d8fd94d-lbzj8    1/1     Running   0          27s
default       pod/sa-web-app-5f7d8fd94d-ql5k2    1/1     Running   0          27s
kube-system   pod/aws-node-7t2df                 1/1     Running   0          27m
kube-system   pod/coredns-8455f84f99-w8dlf       1/1     Running   0          33m
kube-system   pod/coredns-8455f84f99-xqk2f       1/1     Running   0          33m
kube-system   pod/kube-proxy-xzhwd               1/1     Running   0          27m

NAMESPACE     NAME                     TYPE           CLUSTER-IP      EXTERNAL-IP                                                              PORT(S)         AGE
default       service/kubernetes       ClusterIP      10.100.0.1      <none>                                                                   443/TCP         33m
default       service/sa-frontend-lb   LoadBalancer   10.100.64.73    a40ec71f8061811ea91b70a830ca64b1-169405131.us-east-1.elb.amazonaws.com   80:31360/TCP    13m
default       service/sa-logic         ClusterIP      10.100.97.45    <none>                                                                   80/TCP          2m14s
default       service/sa-web-app-lb    LoadBalancer   10.100.34.198   a289bb56f061a11ea86df120e903ee59-714828784.us-east-1.elb.amazonaws.com   80:32321/TCP    5s
kube-system   service/kube-dns         ClusterIP      10.100.0.10     <none>                                                                   53/UDP,53/TCP   33m
sửa cái App.js để nó fetch URL của sa-webapp
nano ~/k8s-mastery/sa-frontend/src/App.js
sửa như sau (dùng ELB URL của sa-webapp):
fetch('http://a7cf3208e067911ea90de1247d6da376-1135942870.us-east-1.elb.amazonaws.com/sentiment', {
build docker images và push lại lên Docker Hub:
npm run build
sudo docker build -f Dockerfile -t $DOCKER_USER_ID/sentiment-analysis-frontend:28 .
sudo docker push $DOCKER_USER_ID/sentiment-analysis-frontend:28
sửa deployment config để dùng image mới tag:28
nano ~/k8s-mastery/resource-manifests/sa-frontend-deployment-update.yaml
sửa chỗ image thành dùng bản tag :28,
cần chú ý chỗ hoangmnsd đó là account Docker Hub của mình, bạn cần dùng account Docker Hub của bạn, ví dụ là CCCCCC mà bạn đã setting ở trên
image: hoangmnsd/sentiment-analysis-frontend:28
apply lại:
kubectl apply -f sa-frontend-deployment-update.yaml --record
check lại app để thông luồng từ frontend -> backend:
a40ec71f8061811ea91b70a830ca64b1-169405131.us-east-1.elb.amazonaws.com
SSH vào Node trong Cluster
Nếu muốn có thể ssh vào Node, trước tiên cần tạo ssh key ssh-keygen:
ip-172-31-84-250 ~]$ ssh-keygen
Generating public/private rsa key pair.
Enter file in which to save the key (/home/ec2-user/.ssh/id_rsa):
Enter passphrase (empty for no passphrase):
Enter same passphrase again:
Your identification has been saved in /home/ec2-user/.ssh/id_rsa.
Your public key has been saved in /home/ec2-user/.ssh/id_rsa.pub.
khi tạo cluster cần tạo với file config như sau:
apiVersion: eksctl.io/v1alpha5
kind: ClusterConfig

metadata:
  name: base-project
  region: us-east-1

availabilityZones: ["us-east-1a", "us-east-1d"]

nodeGroups:
  - name: nodegrp-1
    instanceType: t2.medium
    desiredCapacity: 1
    ssh: # import public key from file
      publicKeyPath: /home/ec2-user/.ssh/id_rsa.pub
Khi ssh vào thì dùng command sau:
ssh -i ~/.ssh/id_rsa ec2-user@<EC2-PUBLIC-IP>
Tạo k8s dashboard
Do mình dùng bản recommend bị ko vào dc từ windows browser, nên dùng bản alternative:
kubectl create -f https://raw.githubusercontent.com/kubernetes/dashboard/v2.0.0-beta5/aio/deploy/alternative.yaml
tạo serviceaccount:
kubectl create serviceaccount my-dashboard-sa -n kubernetes-dashboard
tạo clusterrolebinding:
kubectl create clusterrolebinding my-dashboard-sa \
--clusterrole=cluster-admin \
--serviceaccount=kubernetes-dashboard:my-dashboard-sa
get secret:
kubectl get secrets -n kubernetes-dashboard
Lấy token:
kubectl describe secret -n kubernetes-dashboard <TOKEN_NAME>
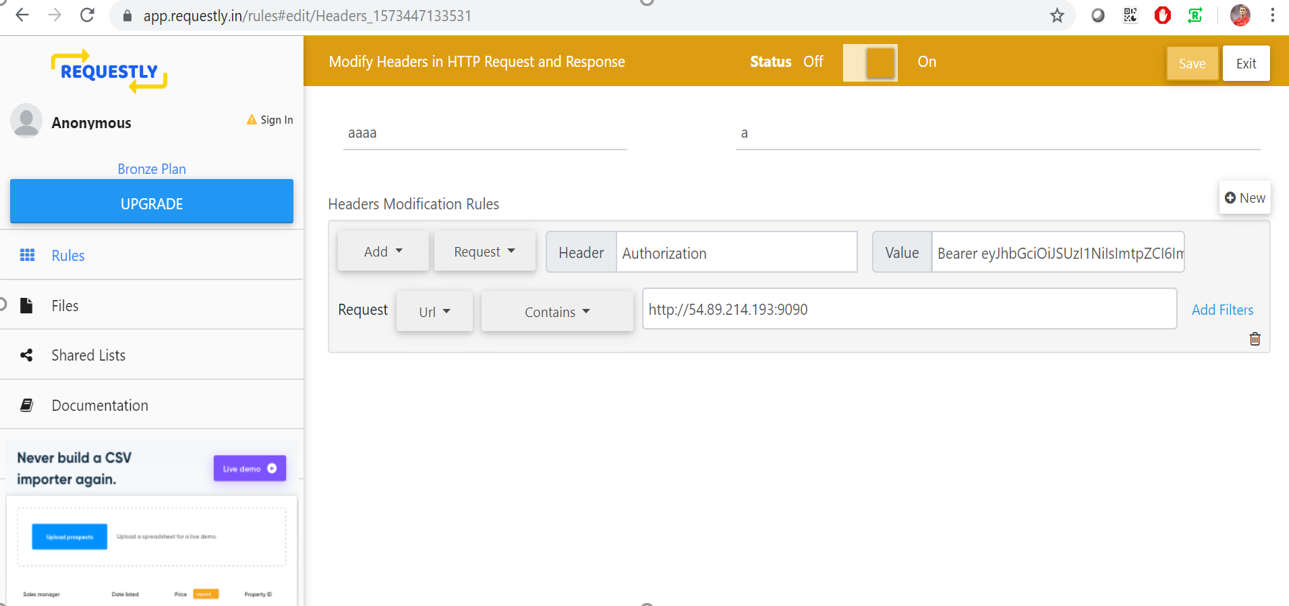
dùng extension REQUESTLY của Chrome, link cài:
https://chrome.google.com/webstore/detail/requestly-redirect-url-mo/mdnleldcmiljblolnjhpnblkcekpdkpa
config như hình sau, mỗi khi vào cái IP kia thì nó sẽ tự động modify Header và add thêm TOKEN vào cho mình
port-forward để bên ngoài có thể access:
kubectl port-forward -n kubernetes-dashboard service/kubernetes-dashboard 9090:80 --address 0.0.0.0
Done! Bạn sẽ vào được k8s Dashboard từ Chrome browser trên windows với link http://<EC-PUBLIC-IP>:9090
Lỗi có thể gặp
Sau khi install helm và app spring postgres,
sau đó thêm k8s dashboard thì bị lỗi POD mới tạo luôn ở trạng thái ContainerCreating
xem logs:
kubectl describe pod <pod_name>
thì phát hiện lỗi network: add cmd: failed to assign an IP address to container
google 1 lúc thì thấy (https://github.com/aws/amazon-vpc-cni-k8s/issues/59),
nguyên nhân có thể do thiếu IP trong ENI
“After checking AWS documentation, it seems that there is an IP limit per instance: 18 for t3.medium, 36 for t3.large”
https://docs.aws.amazon.com/AWSEC2/latest/UserGuide/using-eni.html