K8S 2: How to Access K8s Dashboard On Aws Ec2 Ubuntu
Muốn access vào k8s dashboard thì bạn có nhiều cách, bài này sẽ đưa ra vài cách, theo flow mà mình đã tìm hiểu trong những ngày đầu vọc k8s này
Table of Contents
Giới thiệu
Để vọc Kubernetes trên AWS, có nhiều cách:
cách 1 là dùng Service EKS của AWS, làm việc trên Console luôn, rất trực quan
cách 2 là dùng eksctl là CLI của AWS phát triển, nhiệm vụ tương tự như Service EKS, nhưng ta làm việc với nó trên CLI/terminal
cách 3 là tạo 1 EC2 Ubuntu 18.04 LTS (t2.medium trở lên), cài minikube lên nó, dựng 1 cluster
=> cách 1 và 2 khá tốn kém, nhưng bạn có thể dùng full service, gần với môi trường production nhất,
cách 3 thì rẻ hơn nhiều, các bạn chỉ tốn phí duy trì con EC2 Ubuntu thôi, tuy nhiên cách này chỉ nên dùng để vọc vạch, dùng “cho biết” thế nào là k8s thôi 😆
Bài này mình đang ở cách 3, và hướng dẫn cách để access vào k8s dashboard
Muốn access vào k8s dashboard thì bạn có nhiều cách, bài này sẽ đưa ra vài cách, theo flow mà mình đã tìm hiểu trong những ngày đầu vọc k8s này
Chuẩn bị
Trước tiên thì giống như bài trước, ta cần chuẩn bị AWS EC2 Ubuntu 18.04 LTS, t2.medium
install docker
sudo apt-get update && \
sudo apt-get install docker.io -y
tạo biến môi trường truyền vào thông tin của account Docker Hub của bạn
export DOCKER_USERNAME=AAAABBBB
export DOCKER_PASSWORD=CCCCDDDD
export DOCKER_USER_ID=AAAABBBB
Login vào Docker Hub với account và password của bạn
sudo docker login -u="$DOCKER_USERNAME" -p="$DOCKER_PASSWORD"
install kubectl
curl -LO https://storage.googleapis.com/kubernetes-release/release/$(curl -s https://storage.googleapis.com/kubernetes-release/release/stable.txt)/bin/linux/amd64/kubectl
chmod +x ./kubectl
sudo mv ./kubectl /usr/local/bin/kubectl
install minikube
curl -Lo minikube https://storage.googleapis.com/minikube/releases/latest/minikube-linux-amd64 && chmod +x minikube && sudo mv minikube /usr/local/bin/
check minikube version:
ubuntu@ip-172-31-17-59:~$ minikube version
minikube version: v1.5.2
commit: 792dbf92a1de583fcee76f8791cff12e0c9440ad-dirty
Start minikube lên, từ đây trở xuống sẽ switch sang user root
sudo -i
minikube start --vm-driver=none
Check status của minikube
root@ip-172-31-16-165:~# minikube status
host: Running
kubelet: Running
apiserver: Running
kubeconfig: Configured
Trạng thái khi vừa install minikube xong sẽ như sau:
ip-172-31-80-166:/home/ubuntu/k8s-mastery# kubectl get pods,svc -A
NAMESPACE     NAME                                   READY   STATUS    RESTARTS   AGE
kube-system   pod/coredns-5644d7b6d9-4vtz4           1/1     Running   0          115s
kube-system   pod/coredns-5644d7b6d9-svxqw           1/1     Running   0          115s
kube-system   pod/etcd-minikube                      1/1     Running   0          57s
kube-system   pod/kube-addon-manager-minikube        1/1     Running   0          42s
kube-system   pod/kube-apiserver-minikube            1/1     Running   0          54s
kube-system   pod/kube-controller-manager-minikube   1/1     Running   0          48s
kube-system   pod/kube-proxy-2bw77                   1/1     Running   0          115s
kube-system   pod/kube-scheduler-minikube            1/1     Running   0          66s
kube-system   pod/storage-provisioner                1/1     Running   0          112s

NAMESPACE     NAME                 TYPE        CLUSTER-IP   EXTERNAL-IP   PORT(S)                  AGE
default       service/kubernetes   ClusterIP   10.96.0.1    <none>        443/TCP                  2m4s
kube-system   service/kube-dns     ClusterIP   10.96.0.10   <none>        53/UDP,53/TCP,9153/TCP   2m2s
root@ip-172-31-80-166:/home/ubuntu/k8s-mastery# minikube service list
|-------------|------------|--------------|-----|
|  NAMESPACE  |    NAME    | TARGET PORT  | URL |
|-------------|------------|--------------|-----|
| default     | kubernetes | No node port |
| kube-system | kube-dns   | No node port |
|-------------|------------|--------------|-----|
Đến đây, mọi thứ đã giống với bài trước, muốn access vào k8s dashboard có 2 cách:
Cách 1: Dùng minikube dashboard
Câu lệnh minikube dashboard sẽ tạo ra 2 namespace mới như sau:
(quá trình chạy có thể phải chờ 1 lúc ko thấy lỗi gì ở phần Verifying proxy health … thì có thể Ctrl+C luôn)
ip-172-31-80-166:/home/ubuntu/k8s-mastery/resource-manifests# kubectl get pods,svc -A
NAMESPACE              NAME                                             READY   STATUS    RESTARTS   AGE
kube-system            pod/coredns-5644d7b6d9-4vtz4                     1/1     Running   0          9m55s
kube-system            pod/coredns-5644d7b6d9-svxqw                     1/1     Running   0          9m55s
kube-system            pod/etcd-minikube                                1/1     Running   0          8m57s
kube-system            pod/kube-addon-manager-minikube                  1/1     Running   0          8m42s
kube-system            pod/kube-apiserver-minikube                      1/1     Running   0          8m54s
kube-system            pod/kube-controller-manager-minikube             1/1     Running   0          8m48s
kube-system            pod/kube-proxy-2bw77                             1/1     Running   0          9m55s
kube-system            pod/kube-scheduler-minikube                      1/1     Running   0          9m6s
kube-system            pod/storage-provisioner                          1/1     Running   0          9m52s
kubernetes-dashboard   pod/dashboard-metrics-scraper-76585494d8-n67wm   1/1     Running   0          4m4s
kubernetes-dashboard   pod/kubernetes-dashboard-57f4cb4545-xzdfd        1/1     Running   0          4m4s

NAMESPACE              NAME                                TYPE        CLUSTER-IP       EXTERNAL-IP   PORT(S)                  AGE
default                service/kubernetes                  ClusterIP   10.96.0.1        <none>        443/TCP                  10m
kube-system            service/kube-dns                    ClusterIP   10.96.0.10       <none>        53/UDP,53/TCP,9153/TCP   10m
kubernetes-dashboard   service/dashboard-metrics-scraper   ClusterIP   10.98.238.240    <none>        8000/TCP                 4m10s
kubernetes-dashboard   service/kubernetes-dashboard        ClusterIP   10.102.179.238   <none>        80/TCP                   4m10s
Sau đó dùng port-forward để mở port 9090
kubectl port-forward -n kubernetes-dashboard service/kubernetes-dashboard 9090:80 --address 0.0.0.0
Nếu port-forward bị lỗi socat thì cần install socat apt-get install -y socat nữa, sau đó chạy lại command port-forward bên trên
Từ đây sẽ vào dc dashboard bình thường http://<EC2-PUBLIC-IP>:9090/,
như vậy là dùng minikube dashboard sẽ tạo dashboard rất nhanh
Cũng ko cần tạo admin-user hay ClusterRoleBinding gì cả,
Tuy nhiên cách này ko secure lắm,
vì cách này, trong serivce dashboard của minikube ko thể xóa cái flag –enable-skip-login được
các bạn có thể thử bằng command sau:
kubectl edit deployment kubernetes-dashboard -n kubernetes-dashboard
      containers:
      - args:
        - --namespace=kubernetes-dashboard
        - --enable-skip-login                   # <----xóa 2 dòng này hay 1 dòng đều ko ăn thua
        - --disable-settings-authorizer         # <----xóa 2 dòng này hay 1 dòng đều ko ăn thua
Cứ xóa đi nó lại tự tạo lại
xóa đi rồi thì khi port-forward thì vẫn vào dc dashoboard bình thường, không có secure gì cả
Còn 1 điểm nữa là: ban đầu mình tưởng có thể chỉ định 1 IP để open ở chỗ --address 0.0.0.0,
nhưng thực ra là ko thể chỉ định IP được, bắt buộc phải --address 0.0.0.0
ip-172-31-80-166:/home/ubuntu/k8s-mastery/resource-manifests# kubectl port-forward -n kubernetes-dashboard service/kubernetes-dashboard 9090:80 --address 219.117.237.243
Unable to listen on port 9090: Listeners failed to create with the following errors: [unable to create listener: Error listen tcp4 219.117.237.243:9090: bind: cannot assign requested address]
error: unable to listen on any of the requested ports: [{9090 9090}]

ip-172-31-80-166:/home/ubuntu/k8s-mastery/resource-manifests# kubectl port-forward -n kubernetes-dashboard service/kubernetes-dashboard 9090:80 --address 219.117.237.243/32
error: 219.117.237.243/32 is not a valid IP
Trong cách 1 này thì bạn có thể expose dashboard ra public bằng cách dùng port-forward hoặc dùng service type NodePort
Mình vừa giới thiệu ở phía trên là cách port-forward
Còn nếu dùng cách NodePort, chỉ nên dùng cho môi trường develop (theo link sau nói vậy)
https://github.com/kubernetes/dashboard/blob/master/docs/user/accessing-dashboard/1.7.x-and-above.md
Dùng command sau sửa type của Service tư ClusterIP thành NodePort
kubectl -n kubernetes-dashboard edit service kubernetes-dashboard
Như log sau bạn có thể thấy Service đã thay đổi thành NodePort
ip-172-31-80-166:/home/ubuntu/k8s-mastery/resource-manifests# kubectl get pods,svc -A
NAMESPACE              NAME                                             READY   STATUS    RESTARTS   AGE
kube-system            pod/coredns-5644d7b6d9-4vtz4                     1/1     Running   0          30m
kube-system            pod/coredns-5644d7b6d9-svxqw                     1/1     Running   0          30m
kube-system            pod/etcd-minikube                                1/1     Running   0          29m
kube-system            pod/kube-addon-manager-minikube                  1/1     Running   0          28m
kube-system            pod/kube-apiserver-minikube                      1/1     Running   0          29m
kube-system            pod/kube-controller-manager-minikube             1/1     Running   0          29m
kube-system            pod/kube-proxy-2bw77                             1/1     Running   0          30m
kube-system            pod/kube-scheduler-minikube                      1/1     Running   0          29m
kube-system            pod/storage-provisioner                          1/1     Running   0          30m
kubernetes-dashboard   pod/dashboard-metrics-scraper-76585494d8-n67wm   1/1     Running   0          24m
kubernetes-dashboard   pod/kubernetes-dashboard-57f4cb4545-xzdfd        1/1     Running   0          24m

NAMESPACE              NAME                                TYPE        CLUSTER-IP       EXTERNAL-IP   PORT(S)                  AGE
default                service/kubernetes                  ClusterIP   10.96.0.1        <none>        443/TCP                  30m
kube-system            service/kube-dns                    ClusterIP   10.96.0.10       <none>        53/UDP,53/TCP,9153/TCP   30m
kubernetes-dashboard   service/dashboard-metrics-scraper   ClusterIP   10.98.238.240    <none>        8000/TCP                 24m
kubernetes-dashboard   service/kubernetes-dashboard        NodePort    10.102.179.238   <none>        80:32536/TCP             24m
root@ip-172-31-80-166:/home/ubuntu/k8s-mastery/resource-manifests# minikube service list
|----------------------|---------------------------|----------------------------|-----|
|      NAMESPACE       |           NAME            |        TARGET PORT         | URL |
|----------------------|---------------------------|----------------------------|-----|
| default              | kubernetes                | No node port               |
| kube-system          | kube-dns                  | No node port               |
| kubernetes-dashboard | dashboard-metrics-scraper | No node port               |
| kubernetes-dashboard | kubernetes-dashboard      | http://172.31.80.166:32536 |
|----------------------|---------------------------|----------------------------|-----|
Đến đây thì sẽ vào dc dashboard ở link http://<EC2-PUBLIC-IP>:32536
Tuy nhiên cả cách NodePort này cũng ko secure
Nó open to the world, ai cũng có thể access được
Nếu muốn chuyển lại từ NodePort về ClusterIP
thì bạn cần phải xóa hẳn cái service đó đi, minikube sẽ tự động tạo lại 1 cái service mới mặc định là ClusterIP
delete cái svc đang config NodePort đi bằng command sau:
kubectl delete svc kubernetes-dashboard -n kubernetes-dashboard
log như sau:
ip-172-31-80-166:/home/ubuntu/k8s-mastery/resource-manifests# kubectl get svc -A
NAMESPACE              NAME                        TYPE        CLUSTER-IP      EXTERNAL-IP   PORT(S)                  AGE
default                kubernetes                  ClusterIP   10.96.0.1       <none>        443/TCP                  46m
kube-system            kube-dns                    ClusterIP   10.96.0.10      <none>        53/UDP,53/TCP,9153/TCP   46m
kubernetes-dashboard   dashboard-metrics-scraper   ClusterIP   10.98.238.240   <none>        8000/TCP                 40m
kubernetes-dashboard   kubernetes-dashboard        ClusterIP   10.99.59.17     <none>        80/TCP                   25s
=» Vậy là cách dùng minikube tạo dashboard chỉ có thế thôi, có ưu và nhược như vậy, mình không khuyên dùng cách 1 vì ko tùy biến được nhiều
Giờ nếu muốn Xóa cái minikube dashboard đi thì chỉ có cách là xóa hẳn cluster vm minikube đi thôi, buồn là vậy:
minikube stop; minikube delete
docker stop (docker ps -aq)
rm -r ~/.kube ~/.minikube
sudo rm /usr/local/bin/localkube /usr/local/bin/minikube
systemctl stop '*kubelet*.mount'
sudo rm -rf /etc/kubernetes/
docker system prune -af --volumes
Sau đó install lại kubectl và minikube như phía trên cùng nhé
Sau đó vào start lại thì sẽ thấy mất cái service dashboard
Cách 2: Tạo Dashboard từ file YAML
Cách này là tạo Dashboard from scratch luôn, bạn sẽ có thể tùy chỉnh được nhiều hơn
trước khi làm cách này thì nên xóa minikube triệt để đi, rồi tạo lại nhé
thử cái YAML thứ 1 Recommended:
$ kubectl apply -f https://raw.githubusercontent.com/kubernetes/dashboard/v1.10.1/src/deploy/recommended/kubernetes-dashboard.yaml
Nó sẽ tạo dashboard trong namespace kube-system
chú ý là nếu có sửa file để thay đổi namespace thì cũng sẽ apply fail thôi, nên ko nên sửa làm gì, mình đã thử rồi
ip-172-31-80-166:/home/ubuntu/k8s-mastery/resource-manifests# kubectl get pods,svc -A
NAMESPACE     NAME                                        READY   STATUS    RESTARTS   AGE
kube-system   pod/coredns-5644d7b6d9-m8ltq                1/1     Running   0          44m
kube-system   pod/coredns-5644d7b6d9-qqhqm                1/1     Running   0          44m
kube-system   pod/etcd-minikube                           1/1     Running   0          43m
kube-system   pod/kube-addon-manager-minikube             1/1     Running   0          43m
kube-system   pod/kube-apiserver-minikube                 1/1     Running   0          43m
kube-system   pod/kube-controller-manager-minikube        1/1     Running   0          43m
kube-system   pod/kube-proxy-mz6ns                        1/1     Running   0          44m
kube-system   pod/kube-scheduler-minikube                 1/1     Running   0          43m
kube-system   pod/kubernetes-dashboard-7c54d59f66-2k6cx   1/1     Running   0          30s
kube-system   pod/storage-provisioner                     1/1     Running   0          44m

NAMESPACE     NAME                           TYPE        CLUSTER-IP       EXTERNAL-IP   PORT(S)                  AGE
default       service/kubernetes             ClusterIP   10.96.0.1        <none>        443/TCP                  44m
kube-system   service/kube-dns               ClusterIP   10.96.0.10       <none>        53/UDP,53/TCP,9153/TCP   44m
kube-system   service/kubernetes-dashboard   ClusterIP   10.111.180.197   <none>        443/TCP                  30s
Giờ sẽ dùng port-forward
kubectl port-forward -n kube-system service/kubernetes-dashboard 8443:443 --address 0.0.0.0
nhưng sẽ bị lỗi:
ip-172-31-80-166:/home/ubuntu/k8s-mastery/resource-manifests# kubectl port-forward -n kube-system service/kubernetes-dashboard 8443:443 --address 0.0.0.0
Unable to listen on port 8443: Listeners failed to create with the following errors: [unable to create listener: Error listen tcp4 0.0.0.0:8443: bind: address already in use]
error: unable to listen on any of the requested ports: [{8443 8443}]
Do service mặc định đang để 8443:443 nên phải sửa thành port khác, 8443 thành 6443 chẳng hạn, bằng command sau:
kubectl edit service kubernetes-dashboard -n kube-system
Rồi lại port-forward lần nữa:
kubectl port-forward -n kube-system service/kubernetes-dashboard 6443:443 --address 0.0.0.0
tuy nhiên khi vào trình duyệt ở IP: http://54.209.126.239:6443/
thì vẫn ko đc, terminal có lỗi sau:
E1111 14:10:55.337284 7357 portforward.go:400] an error occurred forwarding 6443 -> 6443: error forwarding port 6443 to pod 230ca1a80532352a973c7da2136127da565232b93f98e76de1a60e0d63d5610e, uid : exit status 1: 2019/11/11 14:10:55 socat[8210] E connect(5, AF=2 127.0.0.1:6443, 16): Connection refused
Chịu luôn ko thể fix được lỗi connection refused này
Thế là mình đã từ bỏ và chuyển sang cái YAML thứ 2 Alternative
trước tiên phải delete cái config cũ đi
kubectl delete -f https://raw.githubusercontent.com/kubernetes/dashboard/v1.10.1/src/deploy/recommended/kubernetes-dashboard.yaml
Tạo cái dashboard bằng fiel YAML 2:
kubectl create -f https://raw.githubusercontent.com/kubernetes/dashboard/v2.0.0-beta5/aio/deploy/alternative.yaml
YAML này sẽ tạo ra dashboard ở trong namespace mới là kubernetes-dashboard
ip-172-31-80-166:/home/ubuntu/k8s-mastery/resource-manifests# kubectl get svc,pods -A
NAMESPACE              NAME                                TYPE        CLUSTER-IP      EXTERNAL-IP   PORT(S)                  AGE
default                service/kubernetes                  ClusterIP   10.96.0.1       <none>        443/TCP                  68m
kube-system            service/kube-dns                    ClusterIP   10.96.0.10      <none>        53/UDP,53/TCP,9153/TCP   68m
kubernetes-dashboard   service/dashboard-metrics-scraper   ClusterIP   10.108.238.95   <none>        8000/TCP                 16s
kubernetes-dashboard   service/kubernetes-dashboard        ClusterIP   10.101.65.242   <none>        80/TCP                   16s

NAMESPACE              NAME                                             READY   STATUS    RESTARTS   AGE
kube-system            pod/coredns-5644d7b6d9-m8ltq                     1/1     Running   0          68m
kube-system            pod/coredns-5644d7b6d9-qqhqm                     1/1     Running   0          68m
kube-system            pod/etcd-minikube                                1/1     Running   0          67m
kube-system            pod/kube-addon-manager-minikube                  1/1     Running   0          67m
kube-system            pod/kube-apiserver-minikube                      1/1     Running   0          67m
kube-system            pod/kube-controller-manager-minikube             1/1     Running   0          67m
kube-system            pod/kube-proxy-mz6ns                             1/1     Running   0          68m
kube-system            pod/kube-scheduler-minikube                      1/1     Running   0          67m
kube-system            pod/storage-provisioner                          1/1     Running   0          68m
kubernetes-dashboard   pod/dashboard-metrics-scraper-76585494d8-5b5w9   1/1     Running   0          16s
kubernetes-dashboard   pod/kubernetes-dashboard-565564f797-sb2qg        1/1     Running   0          16s
sau đó thử port-forward để xem có login được không
kubectl port-forward -n kubernetes-dashboard service/kubernetes-dashboard 9090:80 --address 0.0.0.0
fix bằng cách sau:
kubectl create serviceaccount my-dashboard-sa -n kubernetes-dashboard
kubectl create clusterrolebinding my-dashboard-sa \
--clusterrole=cluster-admin \
--serviceaccount=kubernetes-dashboard:my-dashboard-sa
kubectl get secrets -n kubernetes-dashboard
ip-172-31-80-166:/home/ubuntu/k8s-mastery/resource-manifests# kubectl get secrets -n kubernetes-dashboard
NAME                               TYPE                                  DATA   AGE
default-token-w9sk5                kubernetes.io/service-account-token   3      8m40s
kubernetes-dashboard-csrf          Opaque                                1      8m40s
kubernetes-dashboard-key-holder    Opaque                                2      8m40s
kubernetes-dashboard-token-d7tt4   kubernetes.io/service-account-token   3      8m40s
my-dashboard-sa-token-tms9g        kubernetes.io/service-account-token   3      15s
lấy TOKEN bằng command sau:
kubectl describe secret -n kubernetes-dashboard my-dashboard-sa-token-tms9g
dùng extension REQUESTLY của Chrome, link cài:
https://chrome.google.com/webstore/detail/requestly-redirect-url-mo/mdnleldcmiljblolnjhpnblkcekpdkpa
config như hình sau, mỗi khi vào cái IP kia thì nó sẽ tự động modify Header và add thêm TOKEN vào cho mình
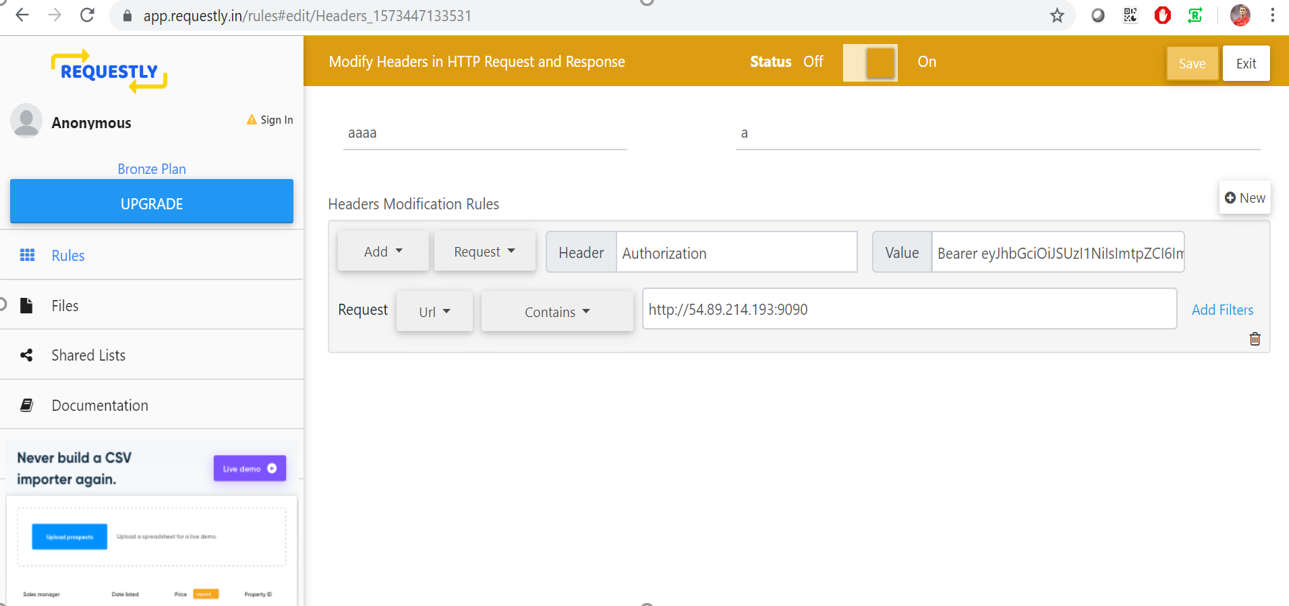
sau đó port-forward thì sẽ tự động login dc vào k8s dashboard
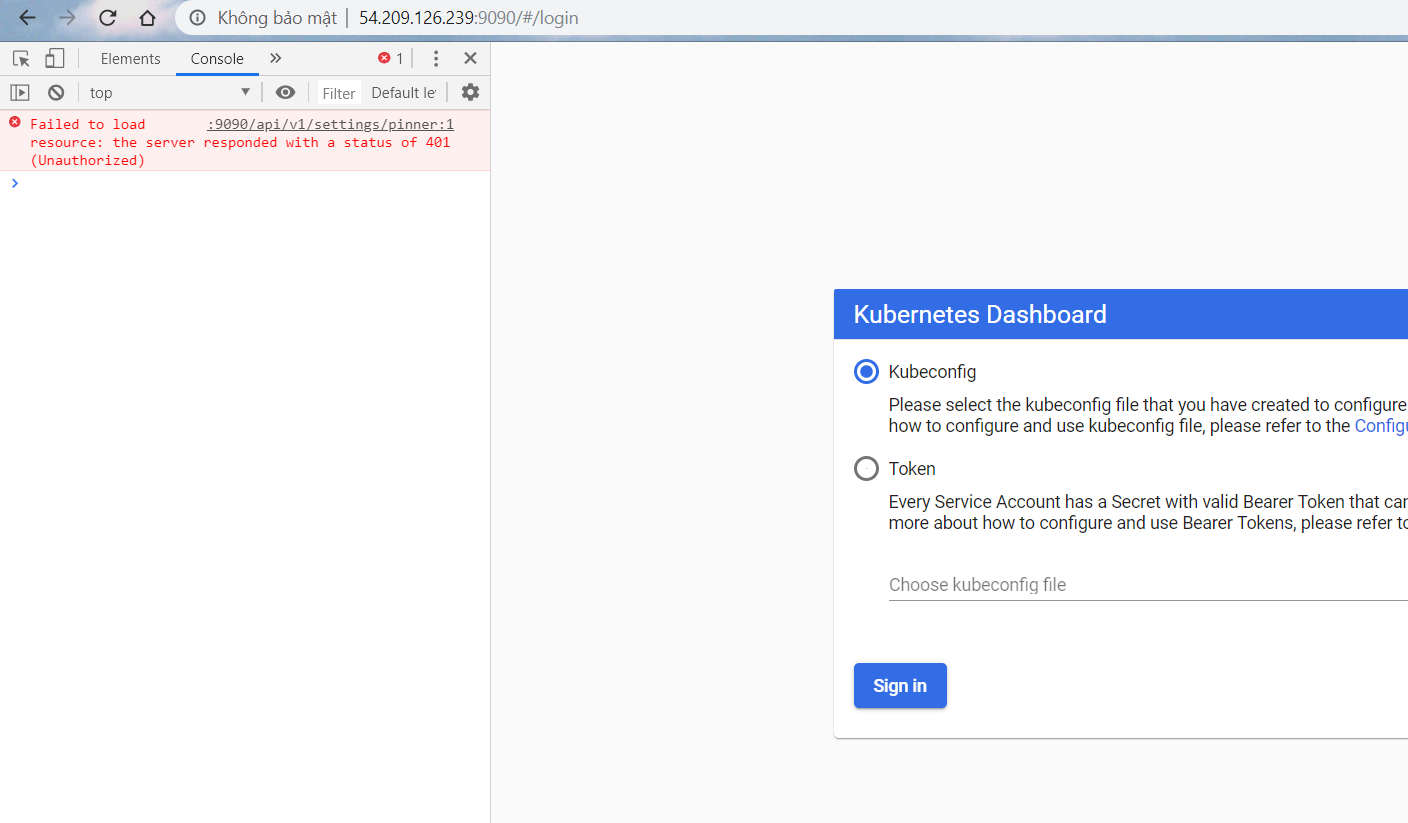
Tuy nhiên vào dashboard bị lỗi
secrets is forbidden: User "system:serviceaccount:kubernetes-dashboard:kubernetes-dashboard" cannot list resource "secrets" in API group "" in the namespace "default"
nhưng phải sửa file YAML ClusterRole như sau mới full quyền:
nano dashboard-cluster-role-test.yaml
# 增加一些想要在dashboard上操作的資源
kind: ClusterRole
apiVersion: rbac.authorization.k8s.io/v1
metadata:
  labels:
    k8s-app: kubernetes-dashboard
  name: kubernetes-dashboard
rules:
 # Allow Metrics Scraper to get metrics from the Metrics server
  - apiGroups: ["","metrics.k8s.io"]
    resources: ["configmaps","pods", "nodes","namespaces","secrets","persistentvolumeclaims"]
    verbs: ["get", "list", "watch"]
  - apiGroups: ["","apps"]
    resources: ["statefulsets","replicationcontrollers", "ingresses","services","daemonsets","configmaps","pods", "nodes","namespaces","secrets","persistentvolumeclaims","replicasets","deployments","events"]
    verbs: ["get", "list", "watch"]
  - apiGroups: ["","extensions"]
    resources: ["ingresses"]
    verbs: ["get", "list", "watch"]
  - apiGroups: ["","batch"]
    resources: ["jobs", "cronjobs"]
    verbs: ["get", "list", "watch"]
  - apiGroups: ["","storage.k8s.io"]
    resources: ["storageclasses", "persistentvolumes"]
    verbs: ["get", "list", "watch"]
  - apiGroups: ["","rbac.authorization.k8s.io"]
    resources: ["clusterroles"]
    verbs: ["get", "list", "watch"]
Sau đó apply file ClusterRole vừa tạo:
kubectl apply -f dashboard-cluster-role-test.yaml
Bạn có thể sửa file alternative.yaml, thêm cái nội dung bên trên vào file thì khi apply chỉ cần apply file alternative.yaml thôi là đủ
Tuyệt vời!!, vậy là đã secure dc k8s dashboard bằng ServiceAccount Token: Authorization Bearer Token
Cách này hay ở chỗ bạn có thể tạo nhiều service account để giới hạn quyền của user
Tuy nhiên lại yêu cầu User phải dùng extension để modify Header bằng TOKEN
Còn 1 cách nữa là Dùng oauth2_proxy
Cách này thì “best secure”
https://blog.heptio.com/on-securing-the-kubernetes-dashboard-16b09b1b7aca
Cách này sẽ bắt User authen qua 1 bên thứ 3 ở đây là GitHub
thì User ko cần phải modify Header bằng Requestly như trên (có thời gian mình sẽ làm)
CREDIT
https://github.com/kubernetes/dashboard/blob/master/docs/user/installation.md
https://github.com/kubernetes/dashboard/blob/master/docs/user/accessing-dashboard/1.7.x-and-above.md
https://kknews.cc/code/56mvxx3.html
https://chrome.google.com/webstore/detail/requestly-redirect-url-mo/mdnleldcmiljblolnjhpnblkcekpdkpa
https://blog.heptio.com/on-securing-the-kubernetes-dashboard-16b09b1b7aca
https://unofficialism.info/posts/accessing-rbac-enabled-kubernetes-dashboard/