Tạo 1 Blog trên Github bằng Hugo
Blog sẽ có dạng https://username.github.io/. Giả định là bạn đang dùng Windows, đã cài đặt Git Bash.
Table of Contents
Blog sẽ có dạng https://username.github.io/.
Giả định là bạn đang dùng Windows, đã cài đặt Git Bash
1. Install Hugo bằng file exe cho Windows
Về version của Hugo thì nên chọn version 0.55.6
Install trên Windows nên làm như link sau: https://discourse.gohugo.io/t/howto-install-hugo-on-windows/741
vào link sau: https://github.com/gohugoio/hugo/releases/tag/v0.55.6
download file hugo_0.55.6_Windows-64bit.zip về thư mục tùy ý, chẳng hạn “E:\Downloads"
giải nén ra sẽ có file hugo.exe
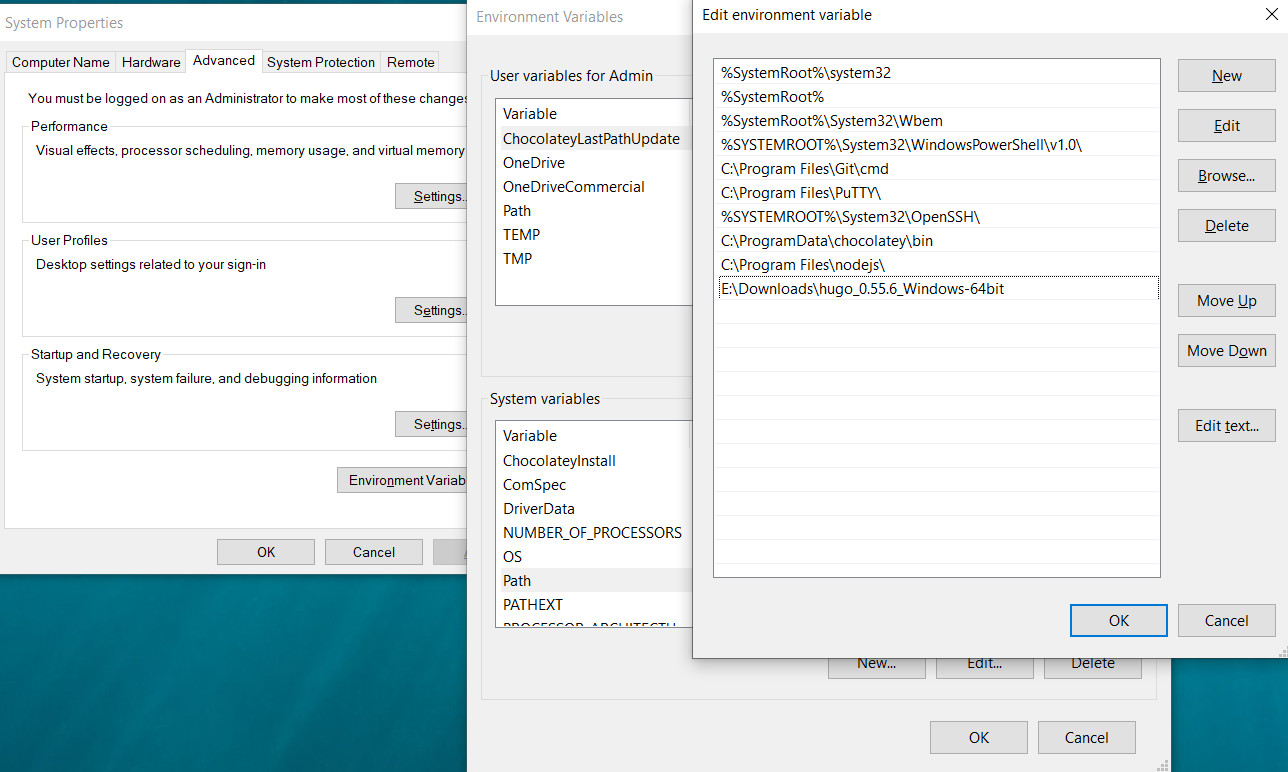
giả sử file hugo.exe trong đường dẫn sau: E:\Downloads\hugo_0.55.6_Windows-64bit
Vào Environment Variables của Windows để add đường dẫn đó vào biến Path như hình sau:
xong check version đúng 0.55.6 là OK:
$ hugo version
Hugo Static Site Generator v0.55.6-A5D4C82D windows/amd64 BuildDate: 2019-05-18T07:57:00Z
Để install Hugo thì cũng có thể sử dụng Chocolatey hoặc Scoop, chọn cái nào thì tùy mọi người.
Tuy nhiên 2 cách này mình chưa biết chọn specific version như nào, nó toàn install latest version (dễ bị lỗi)
2. Install Hugo bằng Choco hoặc Scoop
2.a. Cách 1, Chocolatey
Bật powershell của windows, nhớ chọn Run as Administrator, paste command sau vào:
Set-ExecutionPolicy Bypass -Scope Process -Force; `
  iex ((New-Object System.Net.WebClient).DownloadString('https://chocolatey.org/install.ps1'))
2.b. Cách 2, Scoop
Bật powershell của windows, nhớ chọn Run as Administrator, paste command sau vào:
Set-ExecutionPolicy RemoteSigned -scope CurrentUser
tắt powershell rồi bật lại, nhớ chọn Run as Administrator, paste command sau vào:
iex (new-object net.webclient).downloadstring('https://get.scoop.sh')
2.c. Install Hugo
Run Git Bash as Administrator, từ đây trở xuống các command sẽ sử dụng Git Bash:
Nếu dùng Chocolatey:
choco install hugo -confirm
Nếu dùng Scoop:
scoop install hugo
Chắc chắn rằng bạn đã cài đặt hugo thành công:
hugo version
Nếu màn hình terminal hiển thị version có dạng tương tự như sau là đã install hugo thành công:
$ hugo version
Hugo Static Site Generator v0.55.6-A5D4C82D windows/amd64 BuildDate: 2019-05-18T07:57:00Z
3. Tạo và run blog của bạn trên local
3.a. Tạo folder chứa site, chúng ta sẽ chỉ làm việc trong folder này:
mkdir Sites
3.b. Tạo site:
cd Sites
hugo new site username
3.c. Download themes, ở đây mình chọn theme kiera.
Hãy chắc chắn là bạn đang cd đến directory này Sites/username/themes,
clone theme về bằng command sau:
cd Sites/username/themes
git clone https://github.com/avianto/hugo-kiera kiera
3.d. Giờ chúng ta sẽ Copy toàn bộ file trong exampleSite paste đè lên thư mục username,
Hãy chắc chắn là bạn đang cd đến directory này Sites/username,
copy bằng command sau:
cd Sites/username
cp themes/kiera/exampleSite/* .
Nếu không làm dc bằng command thì làm bằng tay trên giao diện cũng ok.
3.e. Giờ sẽ Edit file config.toml trong thư mục Sites/username.
Mở file này bằng Notepad hoặc bất kỳ editor nào,
sửa dòng đầu tiên như sau:
baseurl = "https://username.github.io/"
3.f. Tạo post đầu tiên và tạo file about.
Hãy chắc chắn là bạn đang cd đến directory này Sites/username,
dùng command sau:
cd Sites/username
mkdir content/posts
hugo new posts/first-post.md
hugo new about.md
3.g. File first-post.md sẽ được tự động sinh ra trong Site/username/content/posts.
Edit file first-post.md bằng Notepad:
+++
title = "First Post"
date = 2018-03-03T13:23:10+01:00
draft = false
tags = ["Getting started"]
categories = []
+++

Hello Hugo world! No more excuses for having no blog or documentation now!
3.h. File about.md sẽ được tự động sinh ra trong Site/username/content/.
Edit file about.md bằng Notepad:
+++
title = "About"
date = 2018-03-03T13:50:49+01:00
menu = "main" #Display this page on the nav menu
weight = "30" #Right-most nav item
meta = "false" #Do not display tags or categories
+++

> Waves are the practice of the water. Shunryu Suzuki
3.i. Run trên local.
Hãy chắc chắn là bạn đang cd đến directory này Sites/username,
run command sau:
cd Sites/username
hugo server
mở browser bất kỳ, check site của bạn trên http://localhost:1313/
Giờ có thể tùy ý chỉnh sửa nội dung trong post, hoặc tạo post mới ..v.v
4. Hosting trên Github
Login vào Github,
tạo 1 repo thứ nhất tên username,
tạo 1 repo thứ hai tên username.github.io
add repo thứ nhất vào remote origin của folder username:
cd Sites/username/
git init
git remote add origin https://github.com/username/username.git
clone repo thứ hai về:
cd Sites
git clone https://github.com/username/username.github.io.git
dùng hugo để generate ra html vào thư mục username.github.io vừa clone về
cd Sites/username/
hugo -d ../username.github.io
push lên Github
cd Sites/username.github.io/
git add .
git commit -m "your message"
git push origin master
push cả folder username cũng lên github
cd Sites/username/
git add .
git commit -m "your message"
git push origin master
check thành quả của bạn trên đường link sau: https://username.github.io/
5. Sau mỗi lần update
- Sau này, mỗi khi tạo 1 post mới, check xong xuôi trên local rồi thì bạn hãy cập nhật lên github.
- Để cập nhật lên github thì làm như sau:
generate html bằng hugo vào folder
username.github.io:
cd Sites/username/
hugo -d ../username.github.io
push nội dung trong Sites/username.github.io/ lên Github repo username.github.io
cd Sites/username.github.io/
git add .
git commit -m "your message"
git push origin master
check những thay đổi đã được apply chưa sau khoảng 1 phút. Có 1 cách nữa là tạo submodule nhưng mình ko đề cập ở đây.
Done!